Expanding the Ubiquiti Cloud Key Gen 2+ with a 3.5” Hard Drive
Part of the Project Logs series.
This post walks through my successful expansion of Ubiquiti’s Cloud Key Gen2+ to use a 3.5” hard drive instead of a 2.5” drive.
Motivation
In January 2021, I upgraded my Cloud Key to a 5TB hard drive, which is the maximum officially-supported capacity — likely because that’s practically the biggest 2.5” hard drive available.
Unfortunately, that comes with trade-offs: the 5TB drive Ubiquiti recommended, a Seagate ST5000LM000, seems to be spectacularly unreliable with this workload and in this hot environment. Mine died in October, after less than 9 months of use, and at that point I also discovered there was no warranty on that hard drive.
(It’s also incredibly slow; trying to browse through a video timeline while the Cloud Key used this drive was a hellish experience. I can’t believe Ubiquiti recommends or supports this configuration.)
When trying to figure out what hard drive to use as a replacement, I discovered that the support document listing recommended hard drive upgrades along with the Cloud Key’s peculiar hard drive power requirements has disappeared from Ubiquiti’s website. (Heh, I wonder why.) The Cloud Key Gen 2+ page still advertises that it supports up to 5TB, but there’s no recommendation of what drives to use as an upgrade; it also doesn’t seem to mention anywhere that you can only use drives that don’t require a 12V supply at all.
Anyway.
I did find a couple forum posts alluding to the possibility of hacking the Cloud Key to use a 3.5” drive, along with this 3D-printable mount for the Cloud Key alongside a 3.5” drive. I like this idea; in addition to the ability to use cheaper, larger drives, I can use 7200 RPM NAS-grade drives, which should last a long time with this workload and be plenty fast. Unfortunately, I couldn’t find many other details on this modification; hopefully this post rectifies that.
I should note that this probably voids a Cloud Key’s warranty, but I’m sure whatever warranty I had on mine has long since expired.
The Theory
The overall idea here is simple.
The Cloud Key has a standard SATA connector inside, so it’s possible to use a SATA extension cable, mounted to a 3D-printed adapter on the Cloud Key’s hard drive tray, to bring the SATA connection outside. Then connect it to a hard drive with its own power supply.
Unlike with this project, which cuts off all the cables leading to the SATA power connector, I wanted to bring the power connector’s ground wires out alongside the SATA data cable and connect them to the hard drive power supply’s ground. My thinking here is: the hard drive and Cloud Key are going to need to share the same ground. This should be achieved well enough by plugging them into the same power outlet. But the SATA data cable, which I’m not going to modify, also has some grounds in it, so I may as well make as many ground connections as possible, using thicker-gauge wires than are in the data cable. The more robust ground connection, the better.
Finally, I’ll need to file a small notch into the front of the Cloud Key’s hard drive tray to allow the SATA cable and ground wires to escape.
Parts
The parts list is roughly what you’d expect. I used the following:
- Toshiba N300 6TB NAS Hard Drive: chosen mainly because it was a big-enough, 7200 RPM, NAS-grade drive on sale.
- Standalone HDD power supply: any power supply that can supply enough power for your selected hard drive should work. This particular one is working for me, but it’s pretty obviously low-quality; OTOH, I had trouble finding other, better options.
- SATA Extension Cable, 50cm: 50cm seems like a good length; 40cm may work but would be cutting it close.
- Heat shrink tubing, which I already had at home.
- Solder seal wire connectors, which I already had at home.
- A 3D-printed enclosure, discussed below.
Note: Hard Drive Warranties
It’s important, I have learned, to check a hard drive’s warranty immediately after receiving it. Hard drive manufacturers all have web sites where you can enter a drive’s serial number and get its warranty status. I did this upon receiving the hard drive for this project and confirmed it was in warranty as expected.
Note: Power Supply Quality
This power supply is really cheap, and it shows.
I had planned to just splice the included Molex-to-SATA connector adapter into my wiring harness for this project, but the adapter and/or the connector wired to the power supply are such poor quality that it’s impossible to physically plug them together.
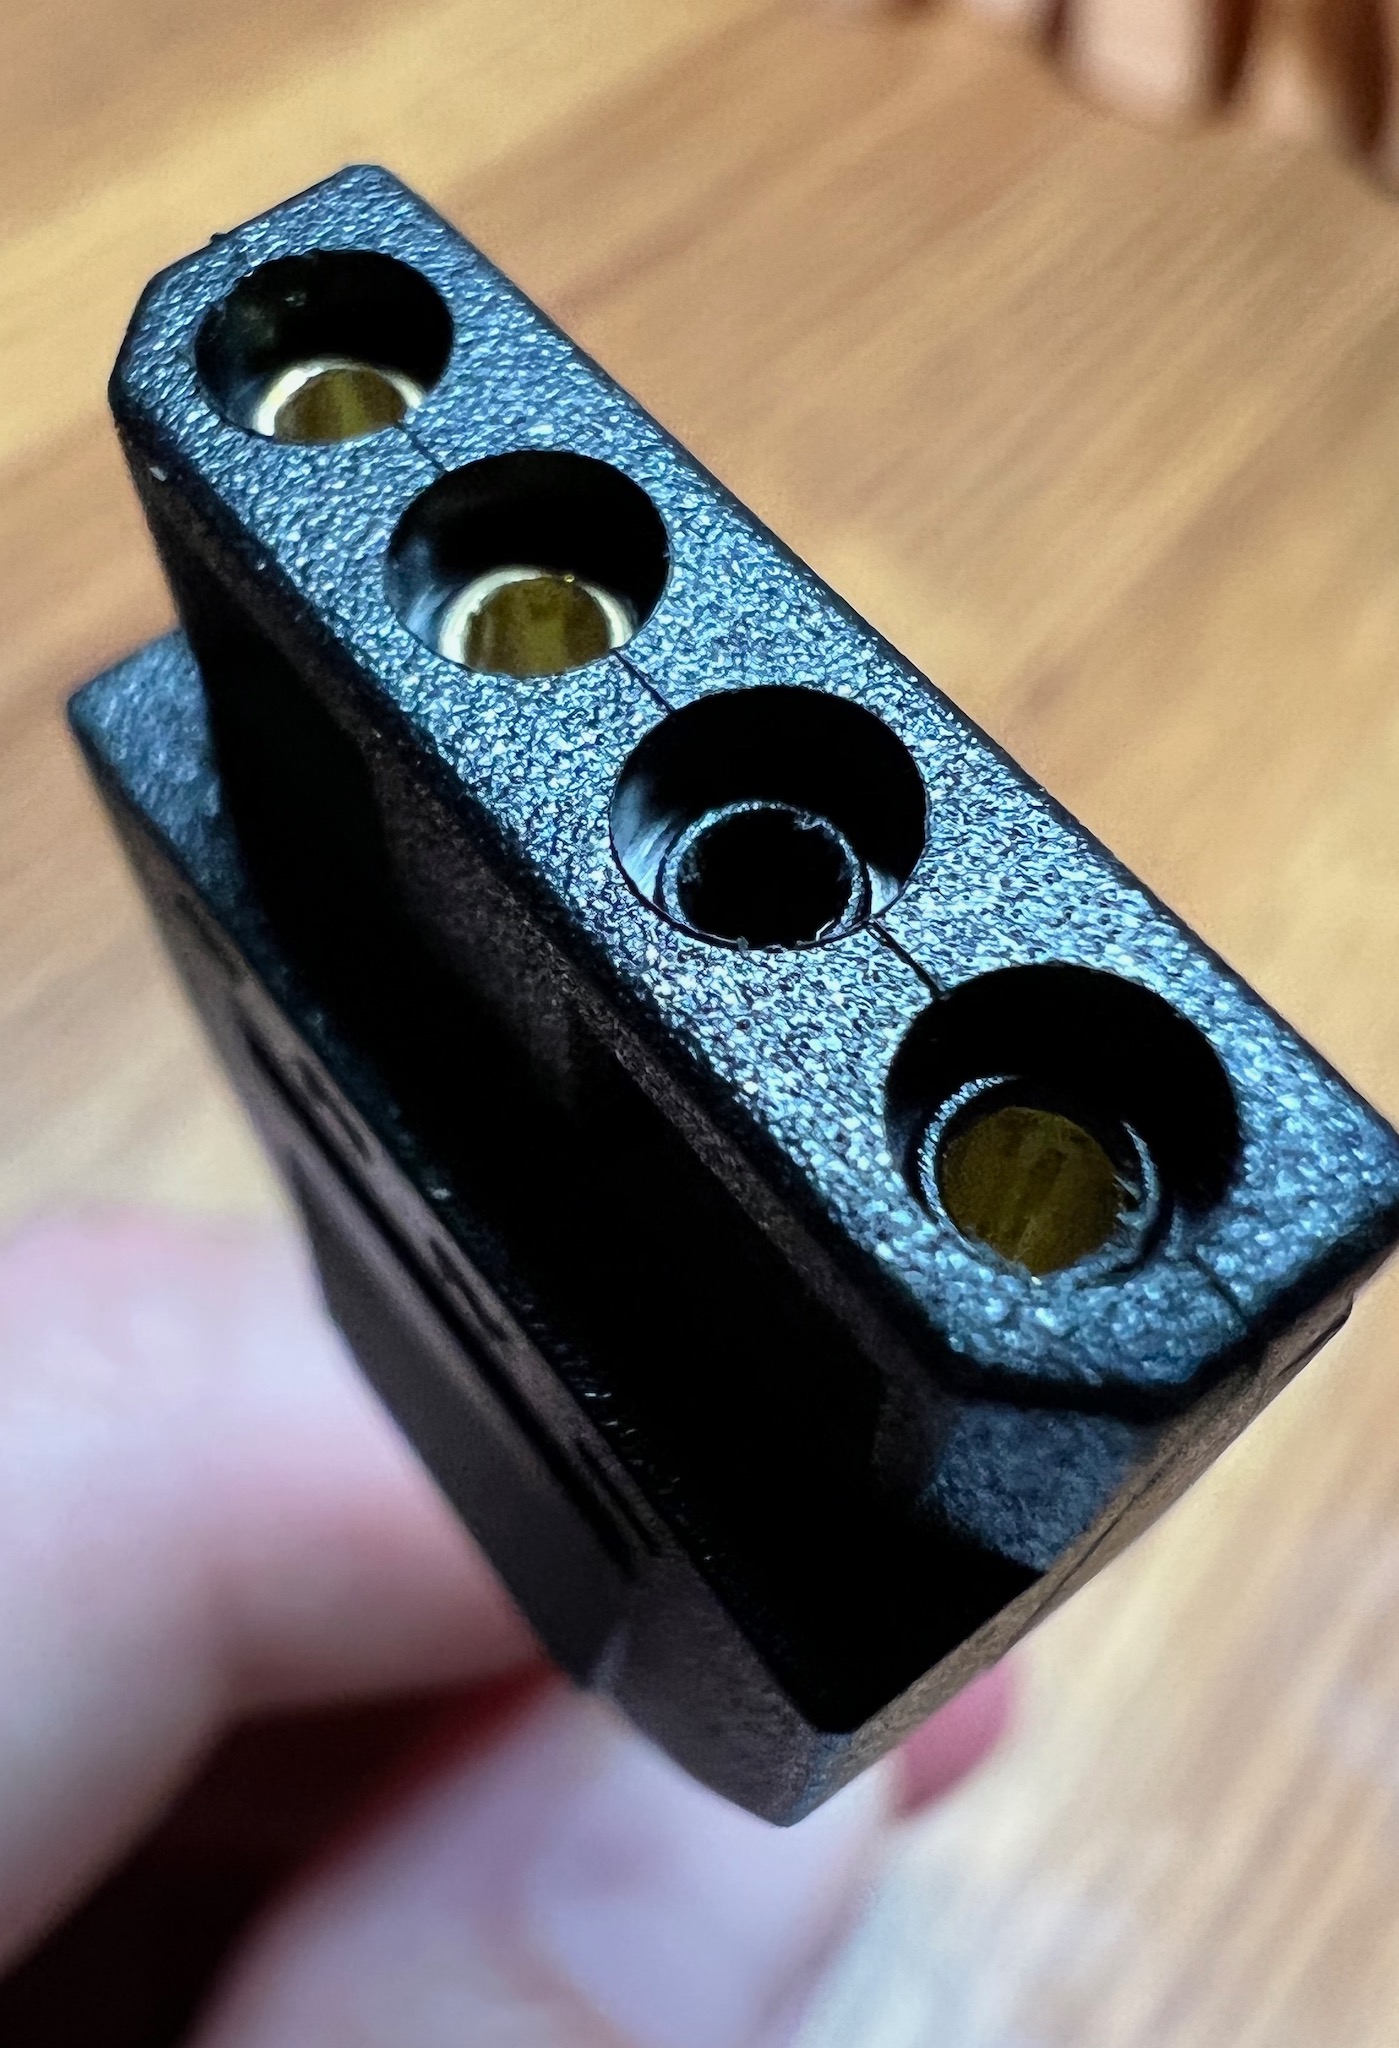
And then, the power supply clearly specifies that two of the output pins are grounded:
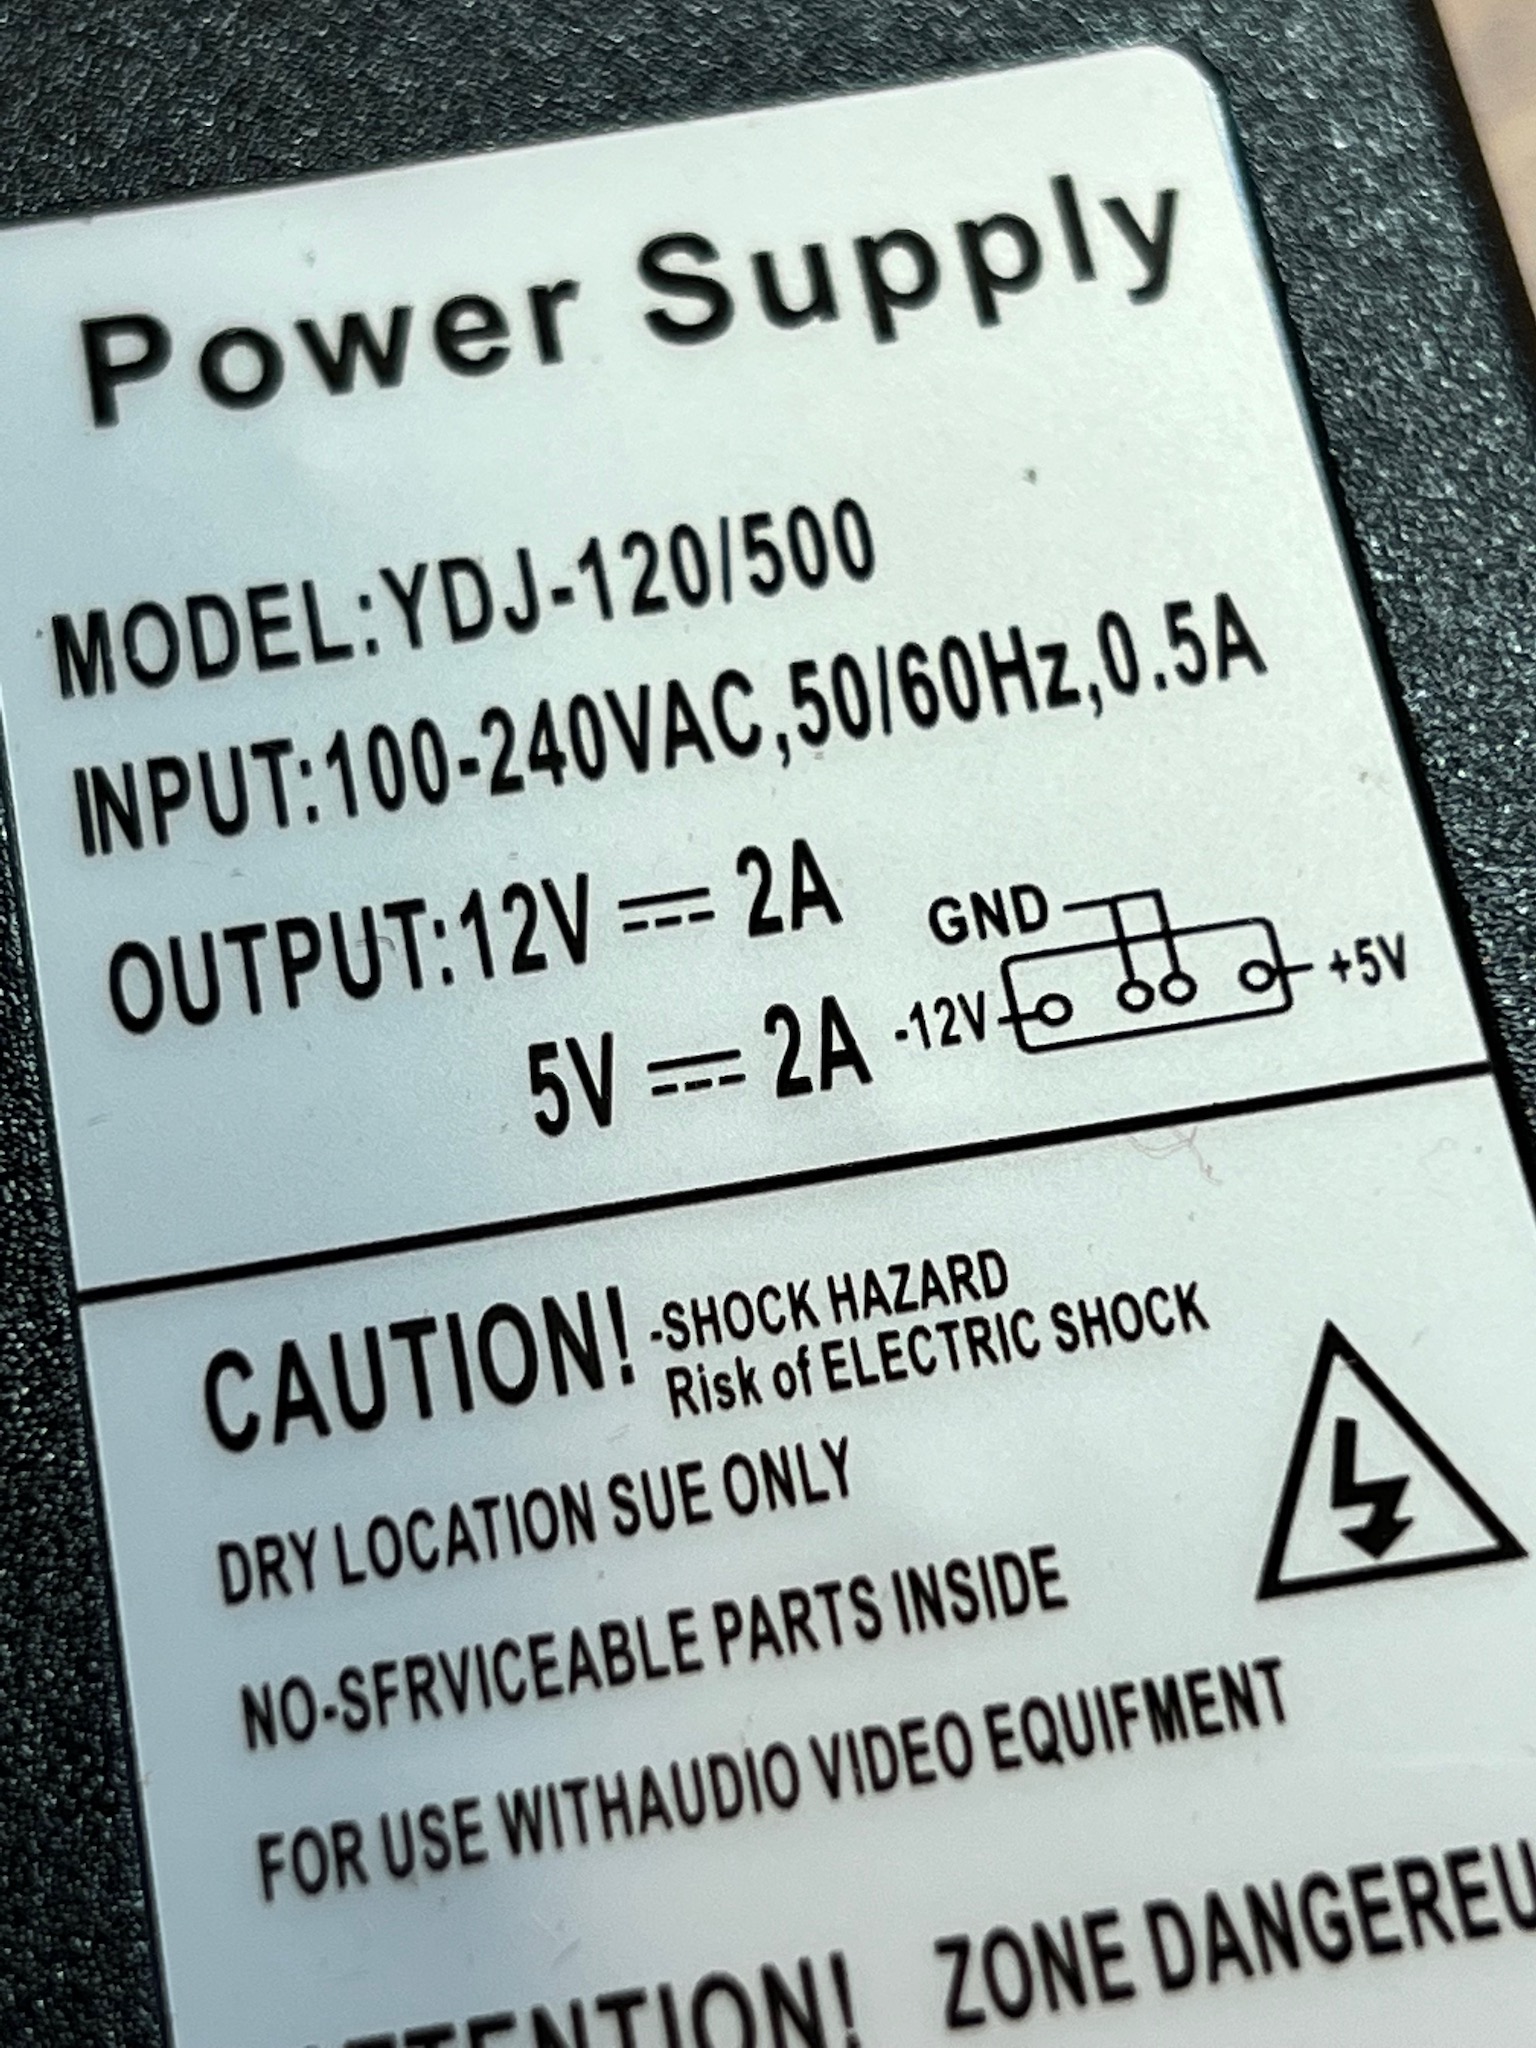
This is clearly not true if you look at the Molex connector wired to the power supply — one of the supposed “ground” pins is completely missing:
To work around this, I just cut off the Molex connector and spliced the wires directly from the power supply into my wiring harness. This exposed another issue with this power supply:
⚠️ The red and yellow wires coming out of my power supply were reversed.
Typically, you expect the red wire to provide 5 volts and the yellow wire to provide 12 volts. In this case, the red wire coming directly from the power supply measured 12 volts, and the yellow wire provided 5 volts.
This means that when wiring this up to the SATA extension cable, I ended up connecting the yellow wire to red, and vice versa.
Note that this may or may not apply to whatever power supply you receive; maybe mine was a fluke.
You should double-check the voltages coming from your particular power supply, wire your harness carefully, and then check the voltages on the SATA power connector on the finished harness, before connecting a hard drive.
Wiring
I needed to build a simple wiring assembly which:
- Doesn’t touch the SATA data extension cable
- Provides 5V and 12V from the new power supply to the 3.5” hard drive
- Connects all ground wires together
This looks like the following diagram:
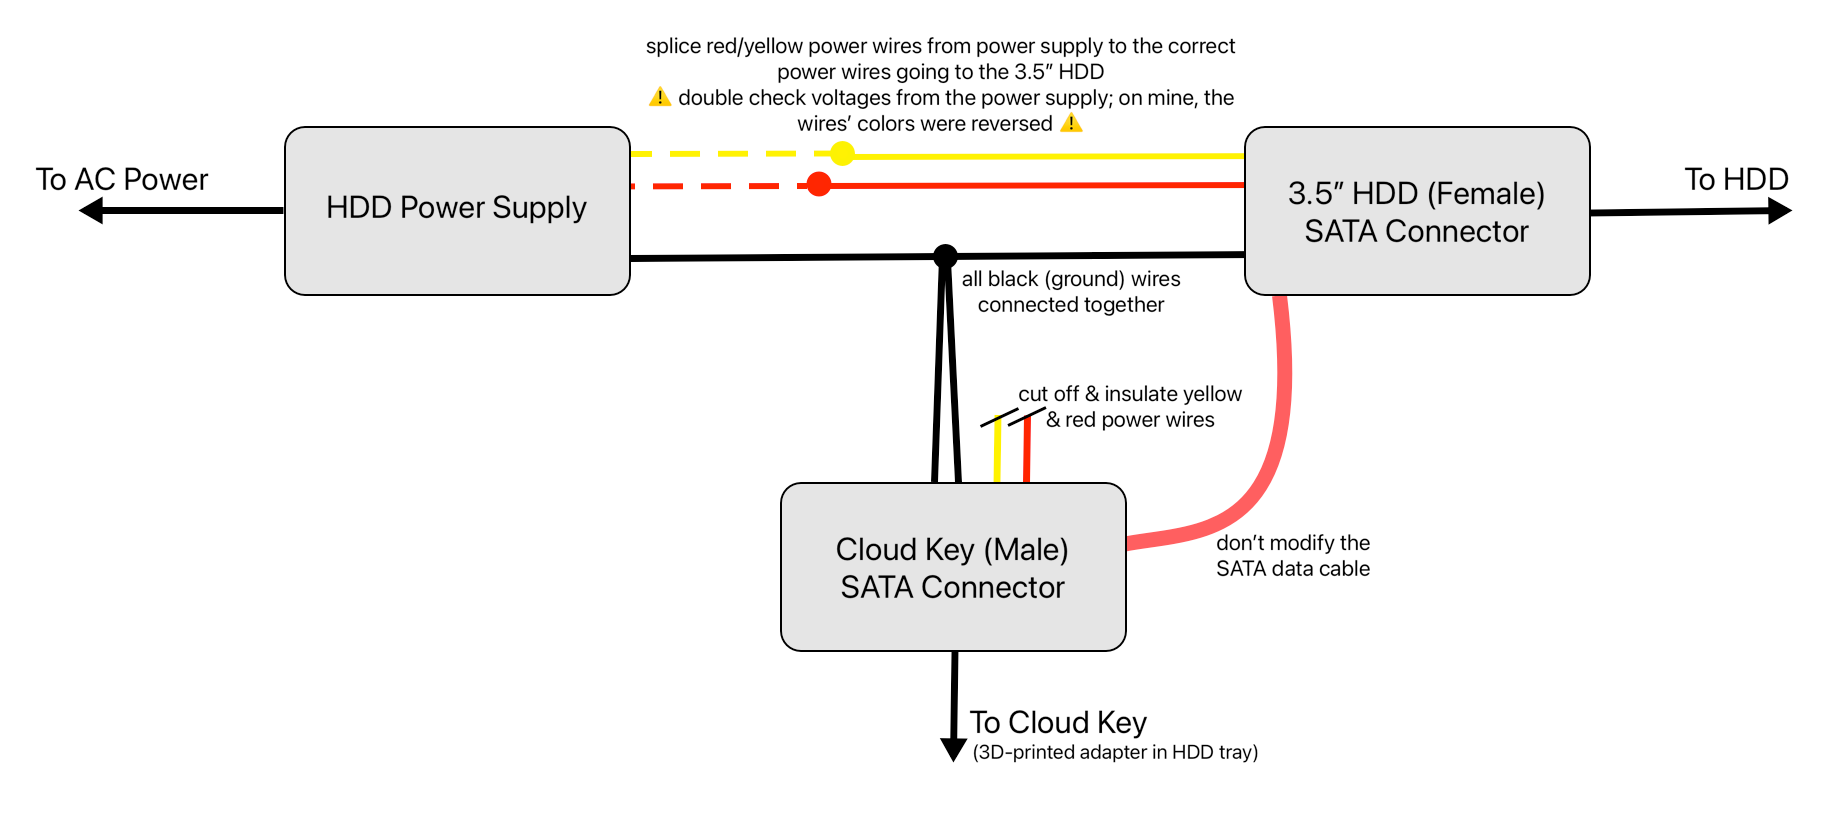
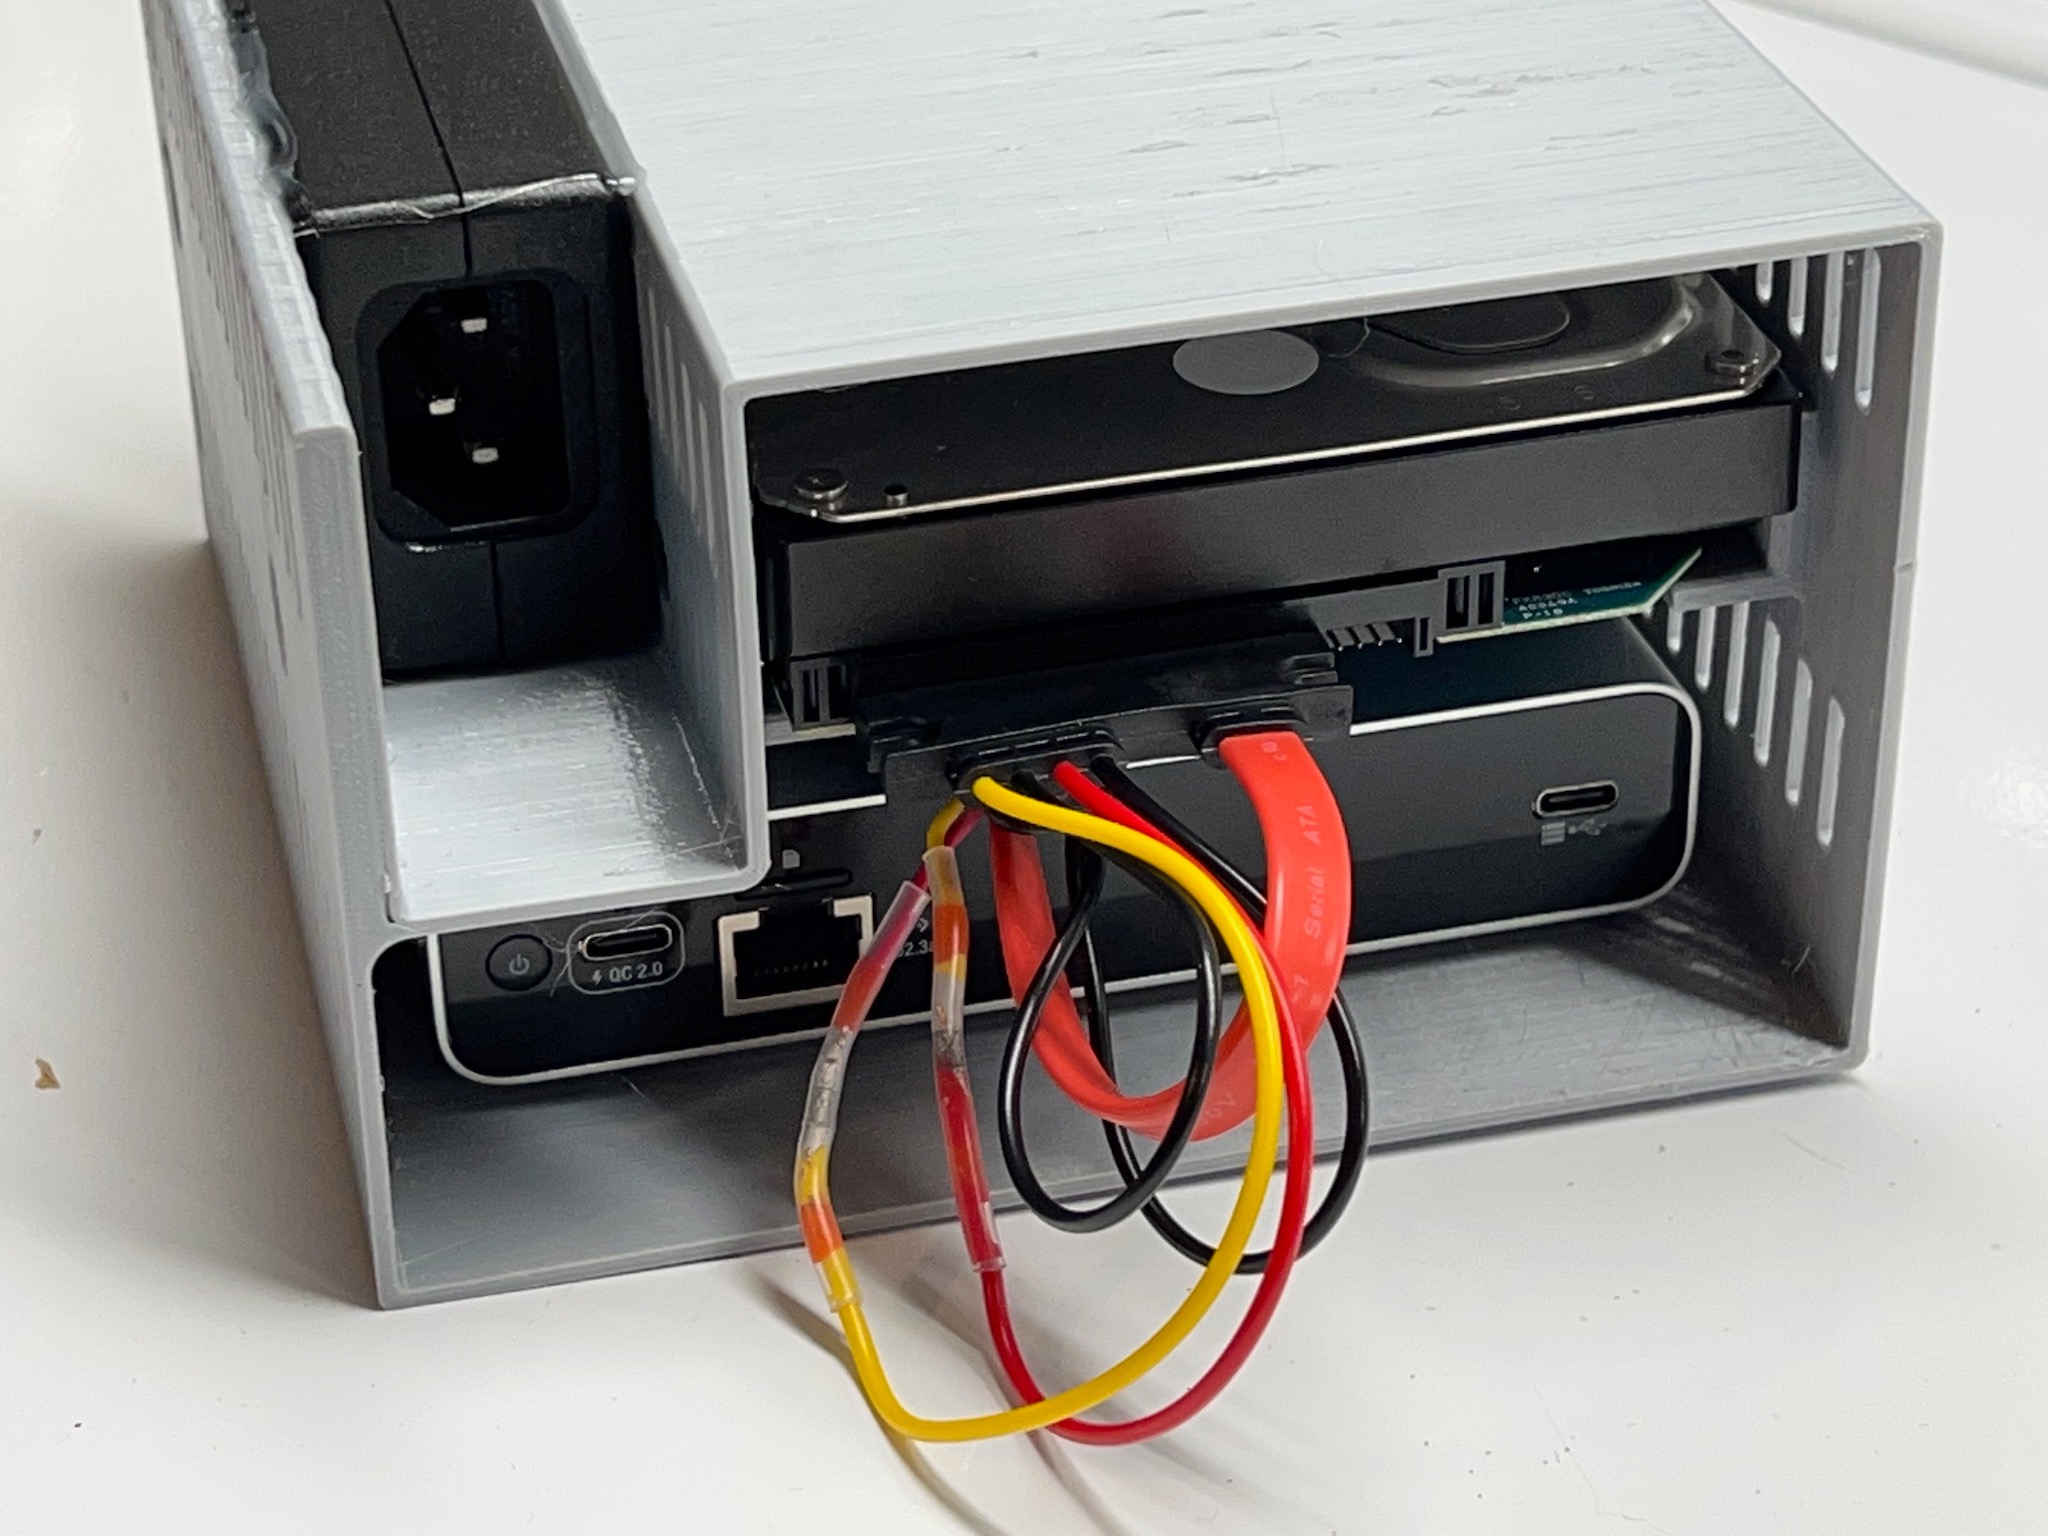
As noted in the previous section, I opted to cut the provided connector off the power supply because it was so poor-quality, and I wired the power supply directly to the wiring harness.
These photos show the result. You will also note that, as discussed in the previous section, I had to connect the power supply’s red wire to the SATA connector’s yellow wire, and vice versa, to provide the correct voltages. Again, your power supply may be different and you should check this carefully before proceeding.
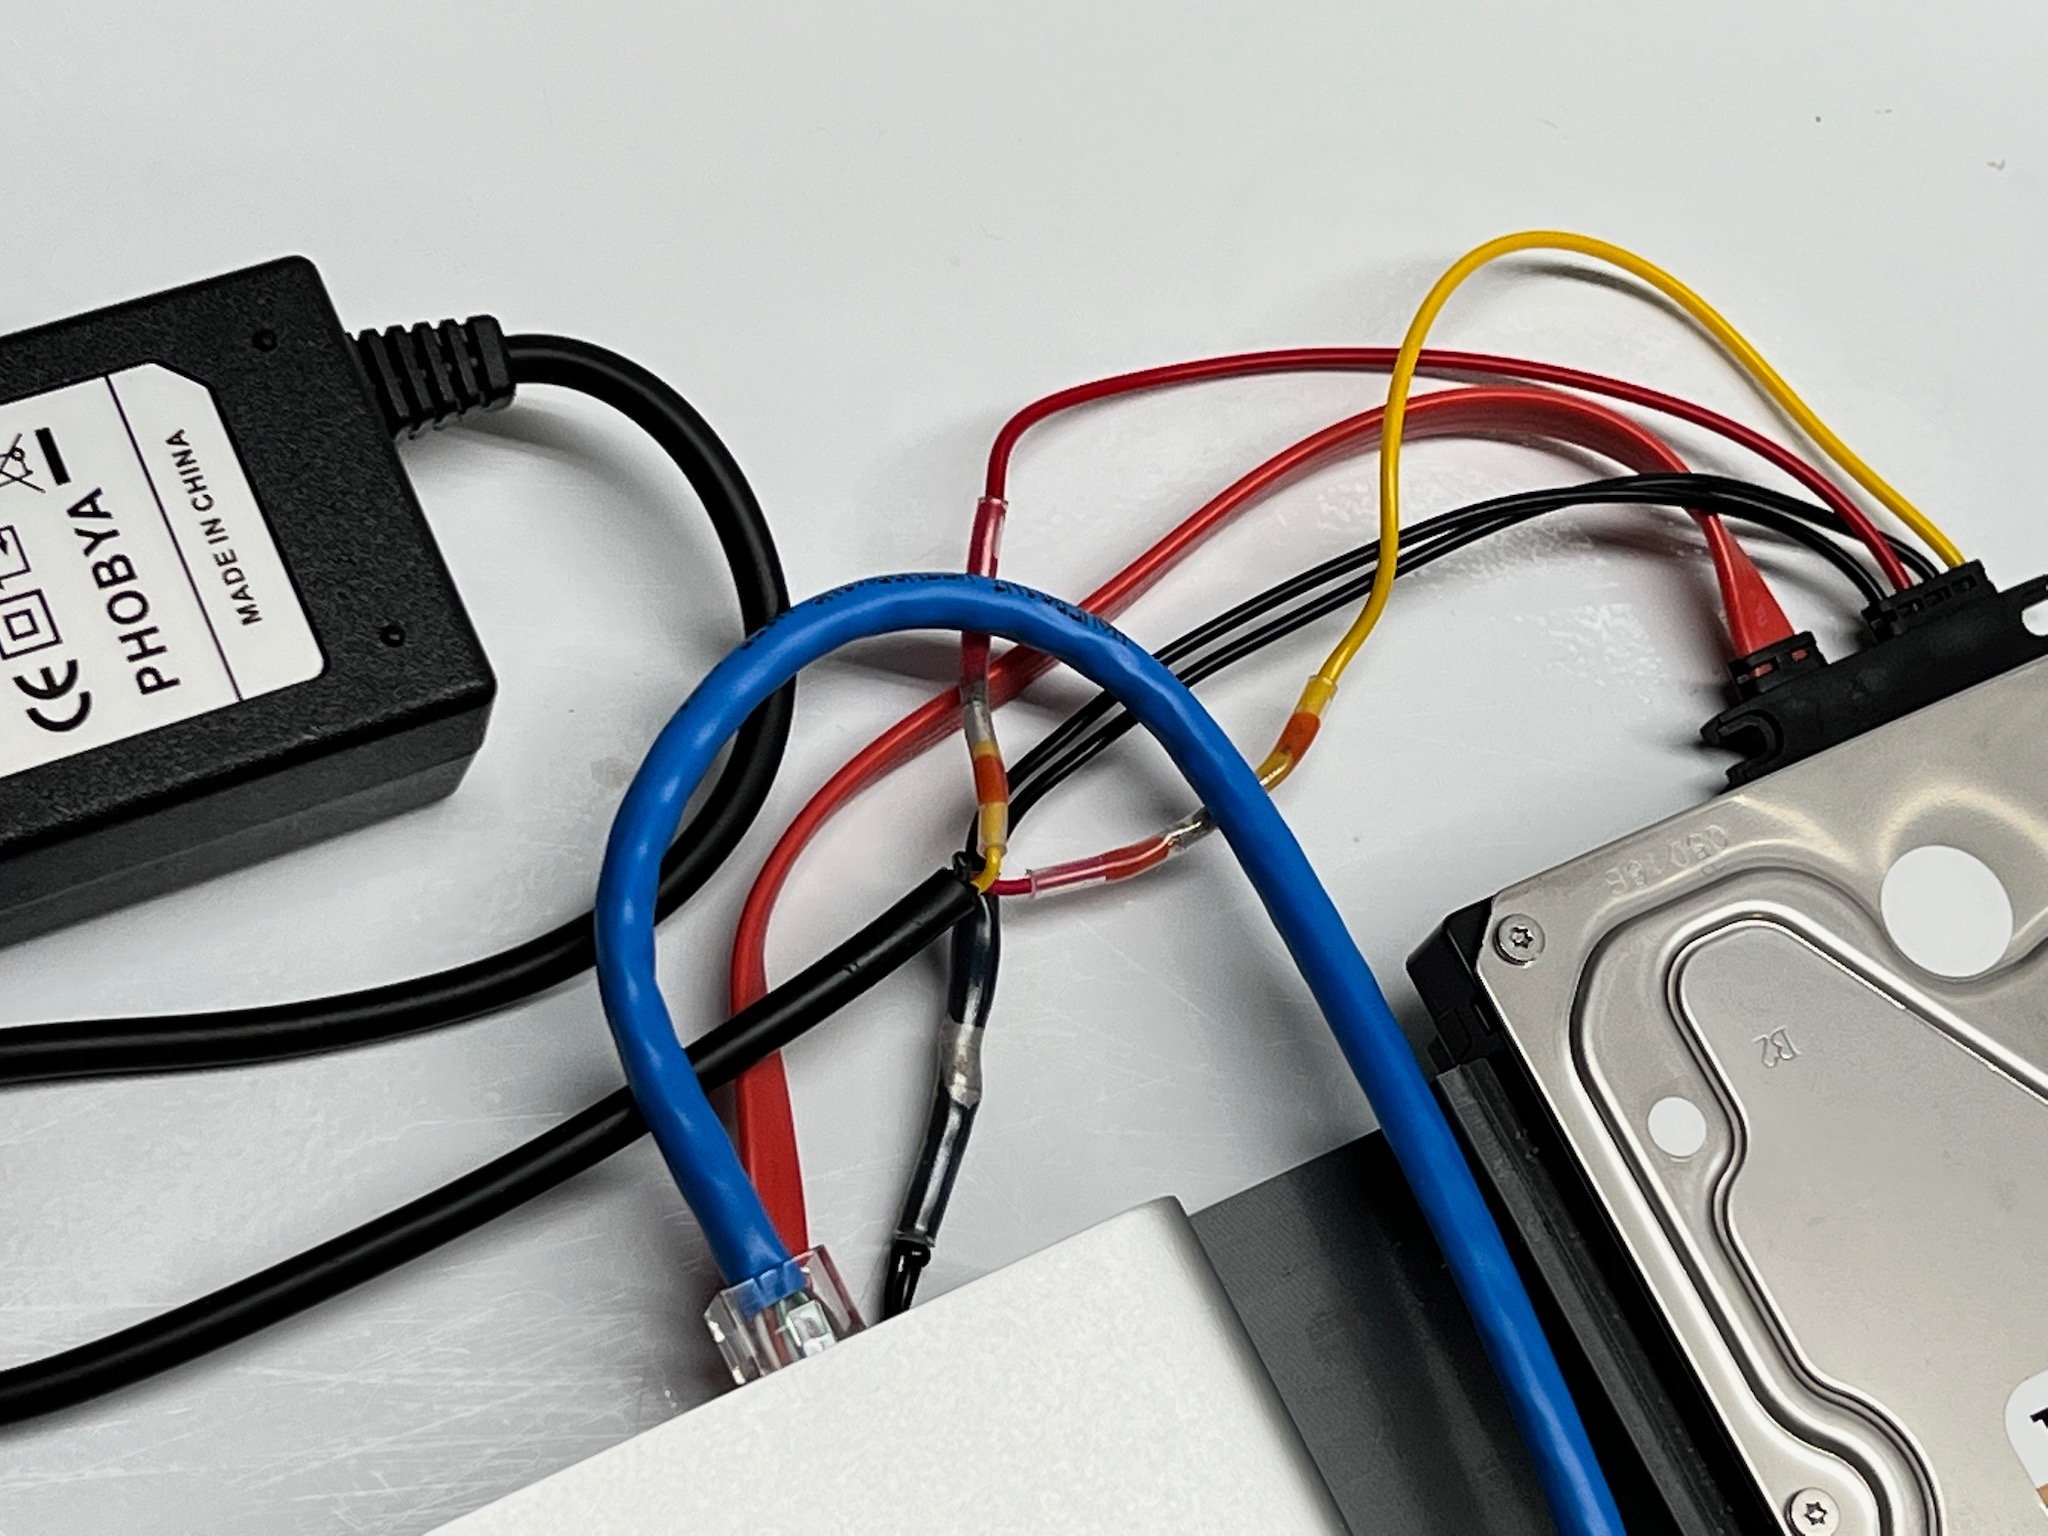
I cut off the red & yellow wires at the Cloud Key end of the wiring assembly and insulated them with heat-shrink tubing:
Assembly
There’s not much to assemble; it’s pretty straightforward.
The only modifications are to the Cloud Key’s hard drive tray — I needed to carefully file a notch into the front, long and wide enough for the SATA cable and ground wires to escape.
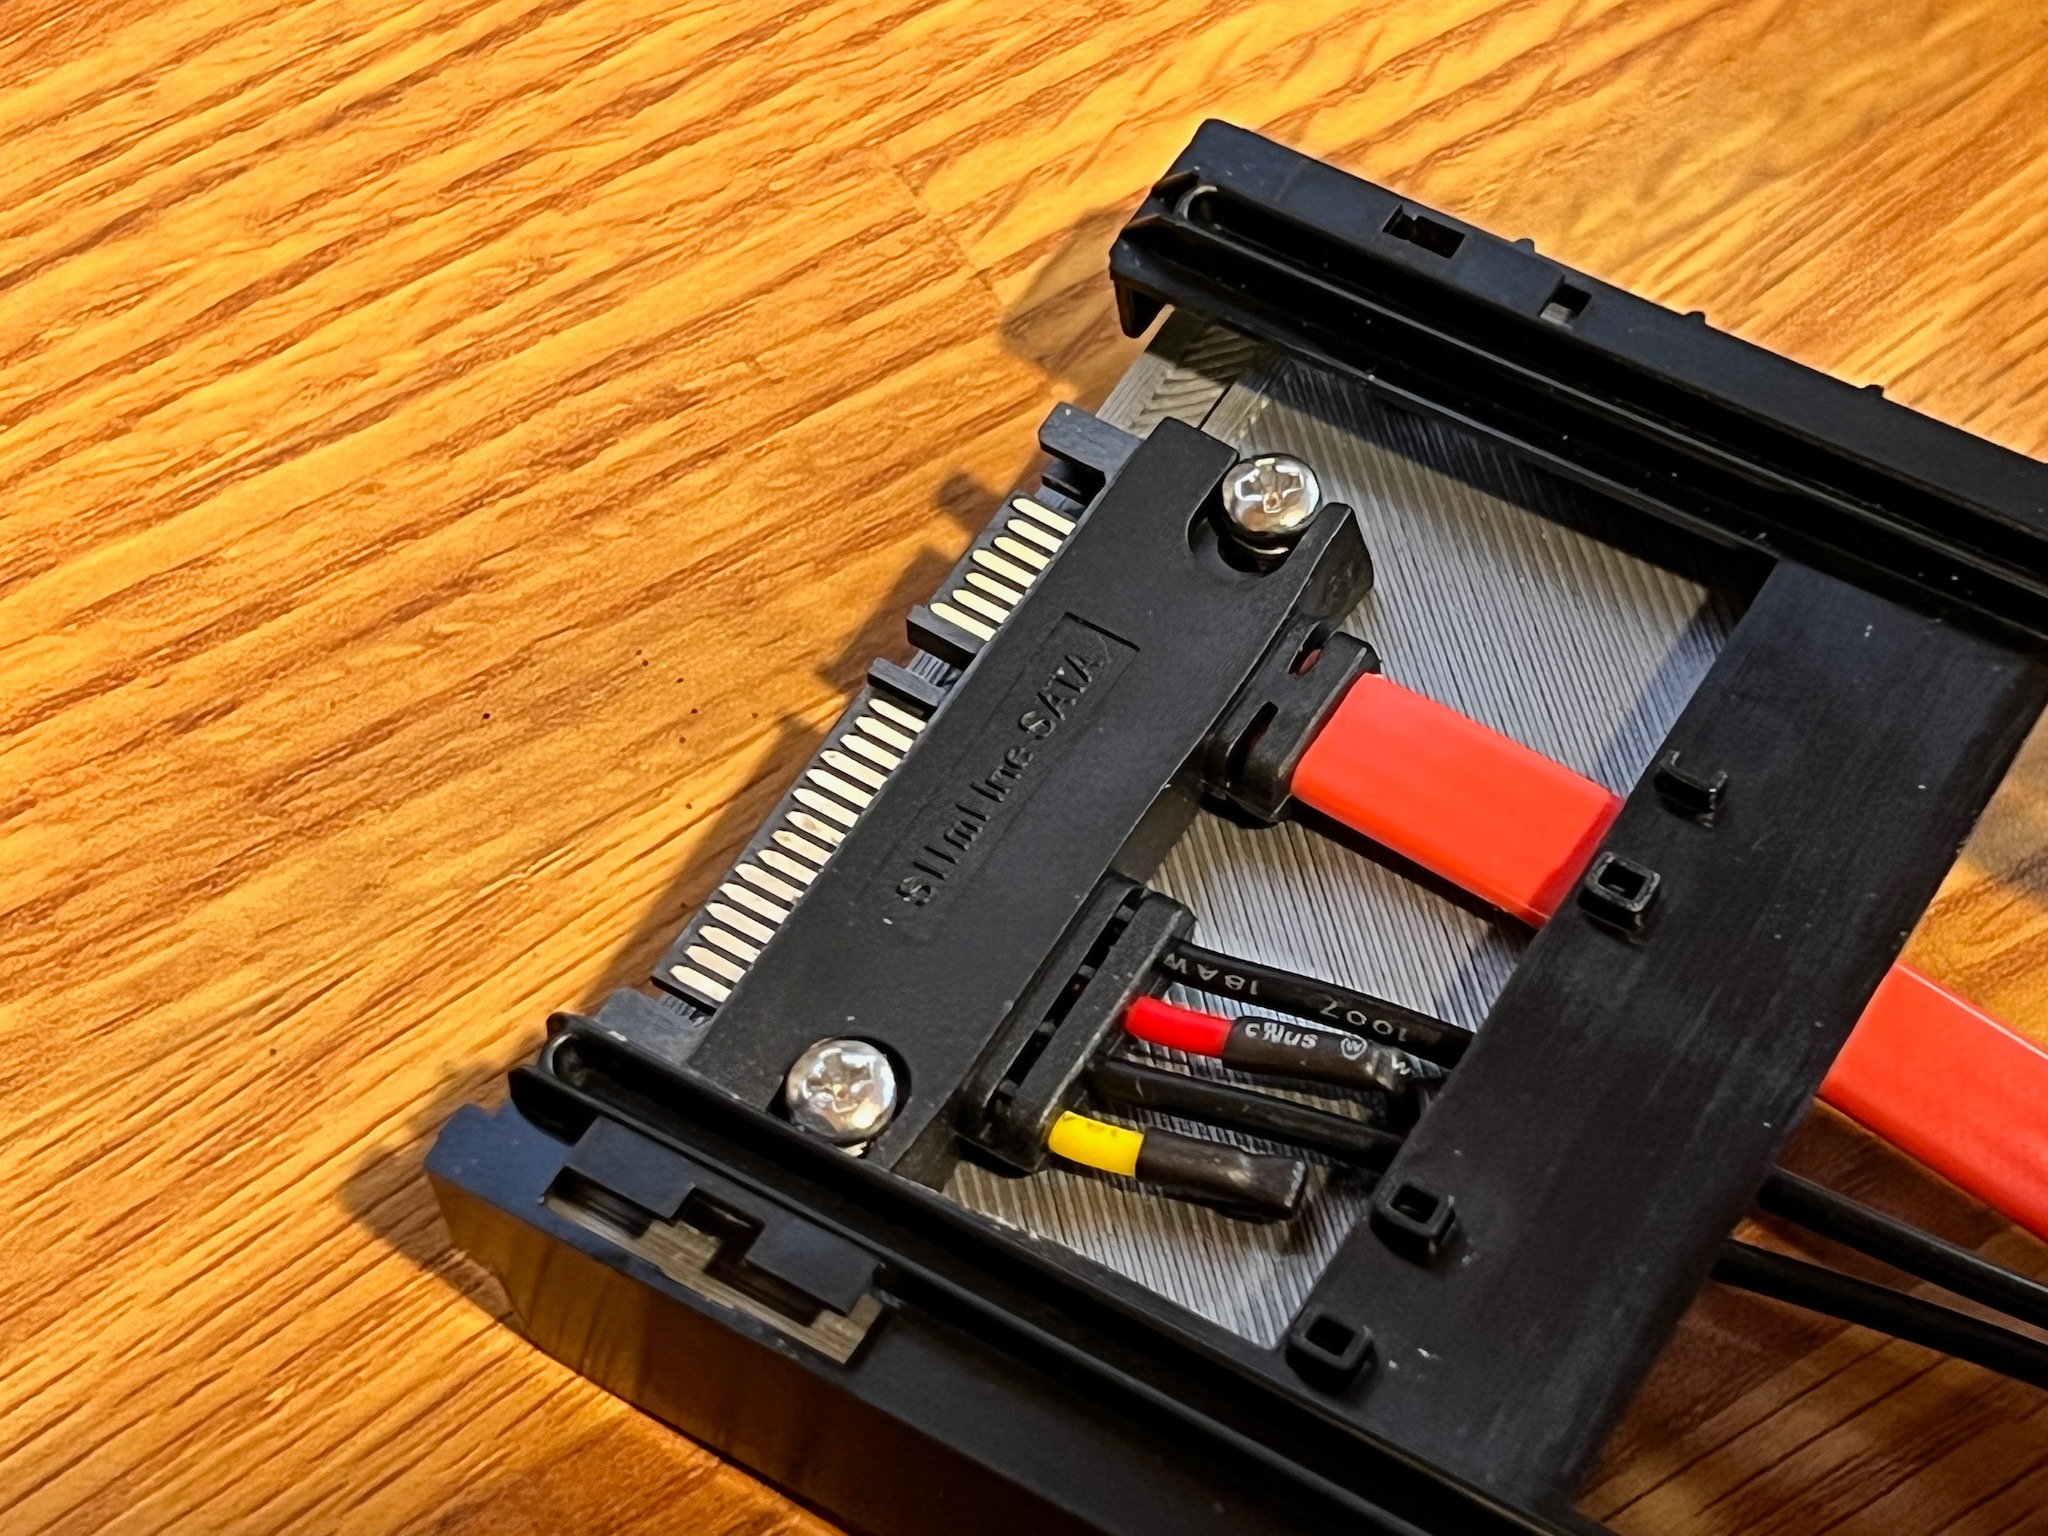
The project I took inspiration from provides a 3D-printable block which I affixed the SATA extension onto and then installed in the Cloud Key hard drive tray. This turned out to require further adjustment; read the next section for details.
To get the tray to fit nicely in the Cloud Key with the M3 screws I had on hand, I had to file down one side of the tray so it wouldn’t interfere with the screw holding the SATA connector. Some photos of this are shown later.
Testing & Debugging
Before going further, I wanted to make sure that I had the correct voltages at the right spots on the power connector.
I plugged in the power supply, and then checked the SATA power connector’s pins with a multimeter. This thread provides a visual reference on which pins should provide 5 volts, 12 volts, and ground.
Again, you should carefully double- and triple-check that your power supply is wired correctly before connecting it to a hard drive.
I then took backups of the UniFi Protect and Network applications, plus one from the Cloud Key’s management interface.
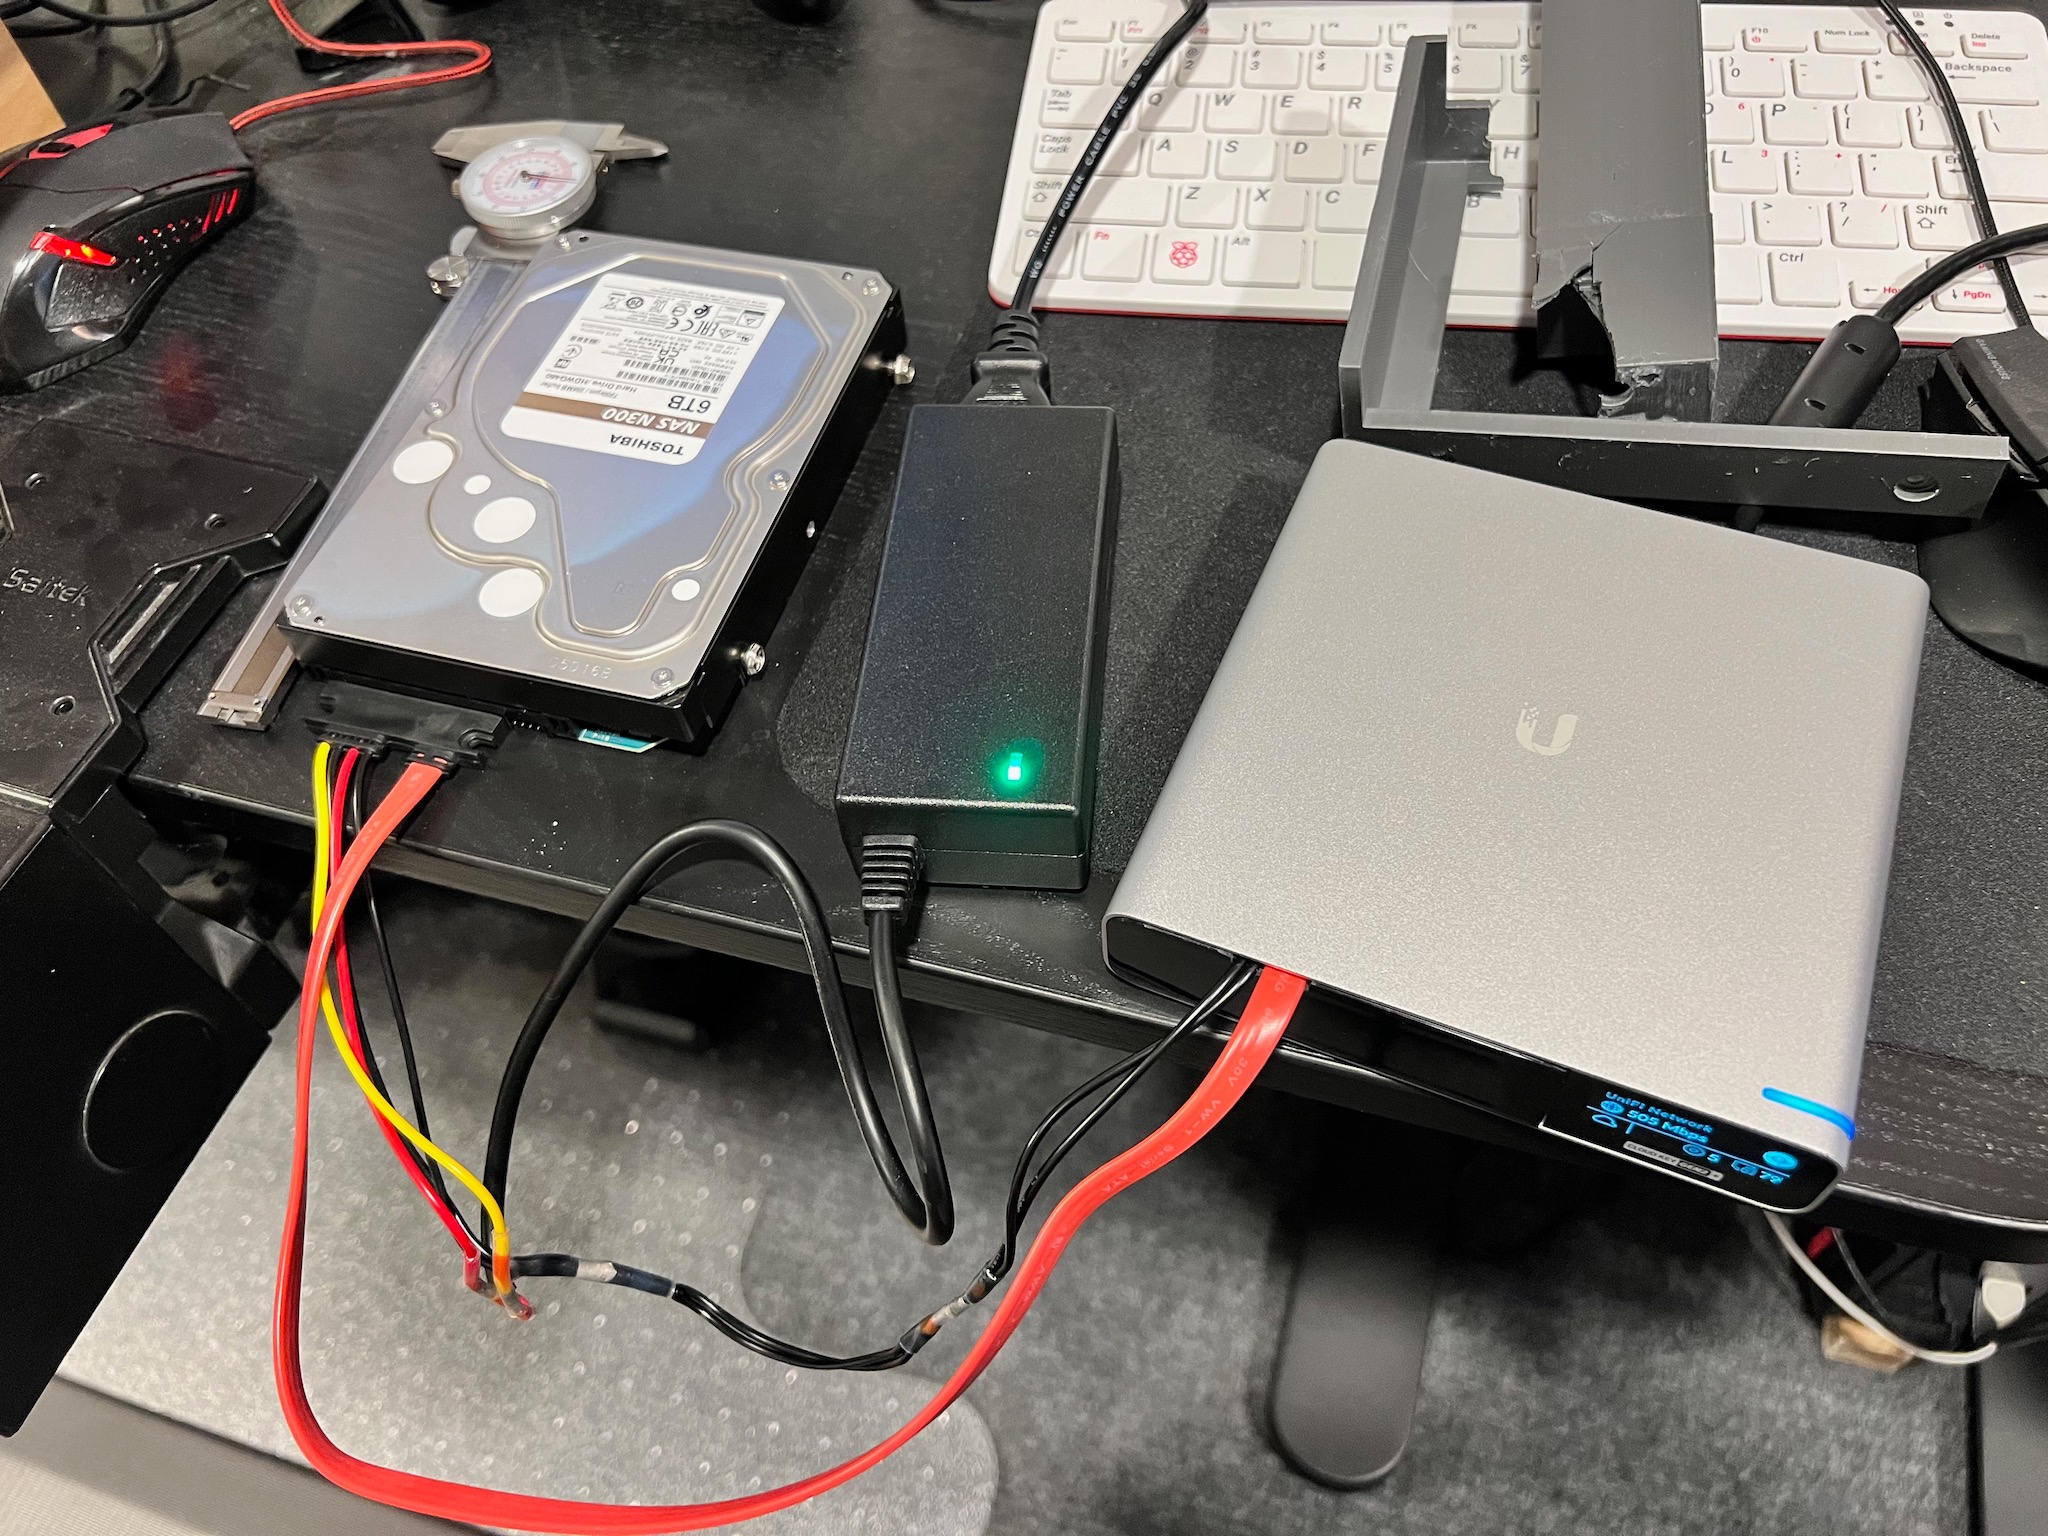
After that, it was time to put it all together for an initial test:
At first, the Cloud Key wouldn’t boot; it kept rebooting and its display read “Hard Disk Error.” It took me a while to figure out what was going on, but some very careful comparisons of the hard drive tray with a 2.5” hard drive installed vs. with the SATA extension block revealed that the SATA connector wasn’t sticking out quite far enough. This connector needs to be further back and also further to the side. I imagine that this project must have used a slightly different SATA extension cable (or maybe they also had this problem and didn’t document a workaround).
Rather than printing another block, since my printer was busy printing my new enclosure design, I just hot-glued the SATA connector to the block in the hard drive tray. The connector needs to be roughly even with the very back of the tray; with the unmodified connector block, it sat about 2mm back from this point.
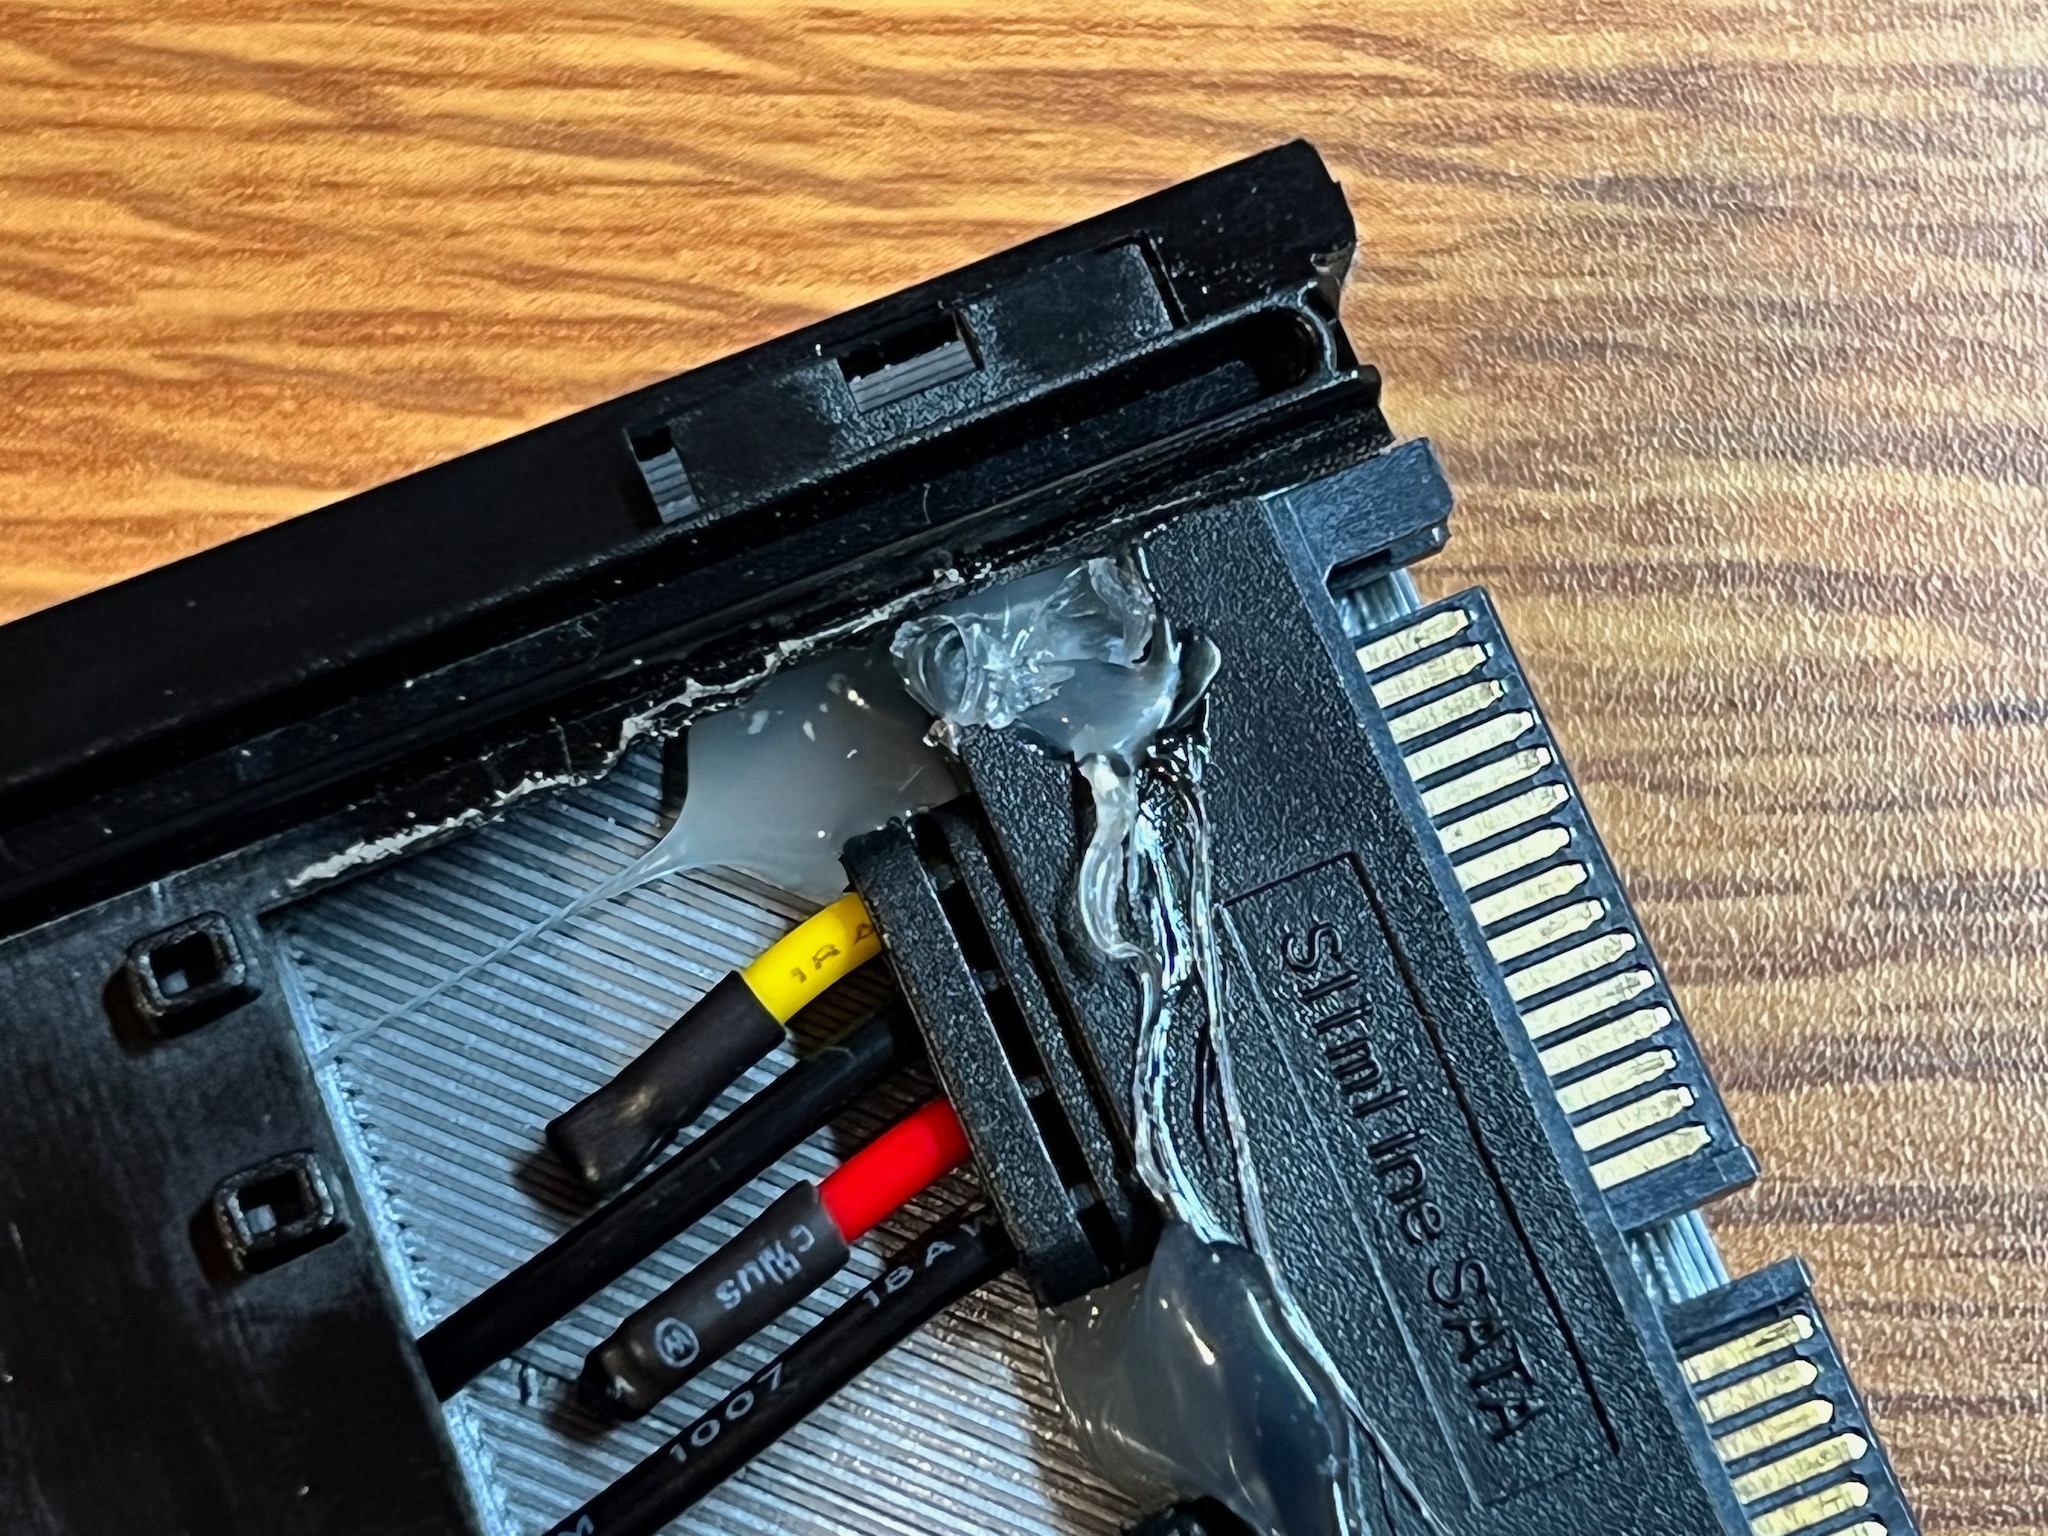
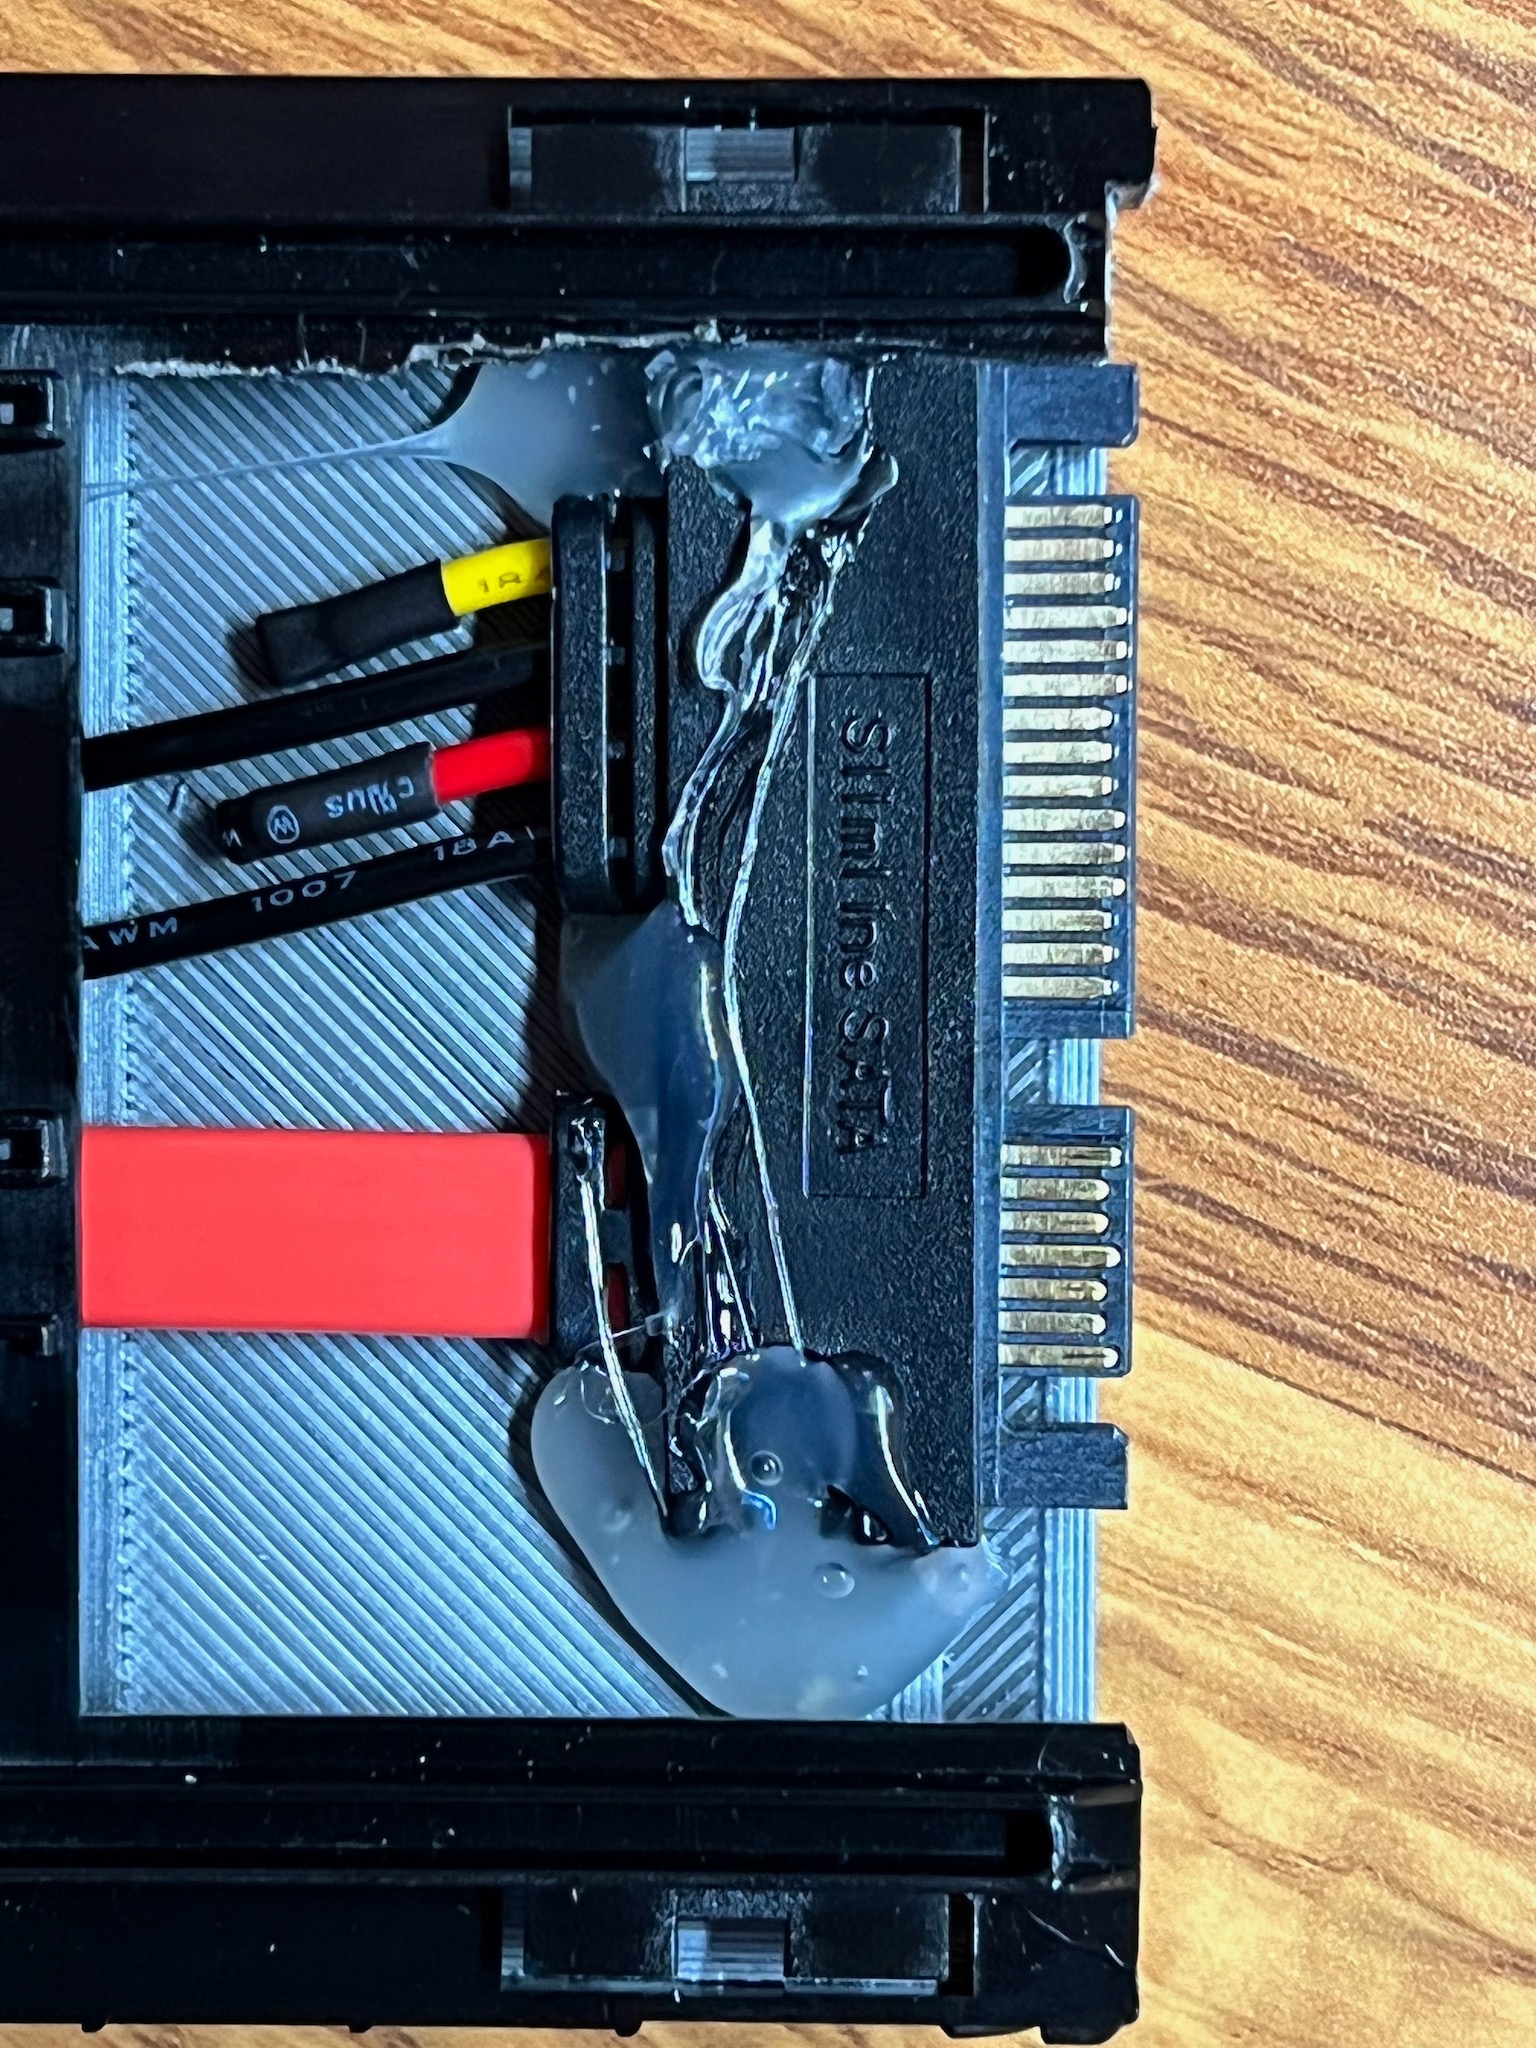
This is clearly not an ideal workaround; I’m sure this glue will fail after plugging & unplugging the tray a few times. But it’s working reliably now, and since the Cloud Key is securely installed in my enclosure now I shouldn’t have to unplug this again in the near future.
3D-Printed Enclosure
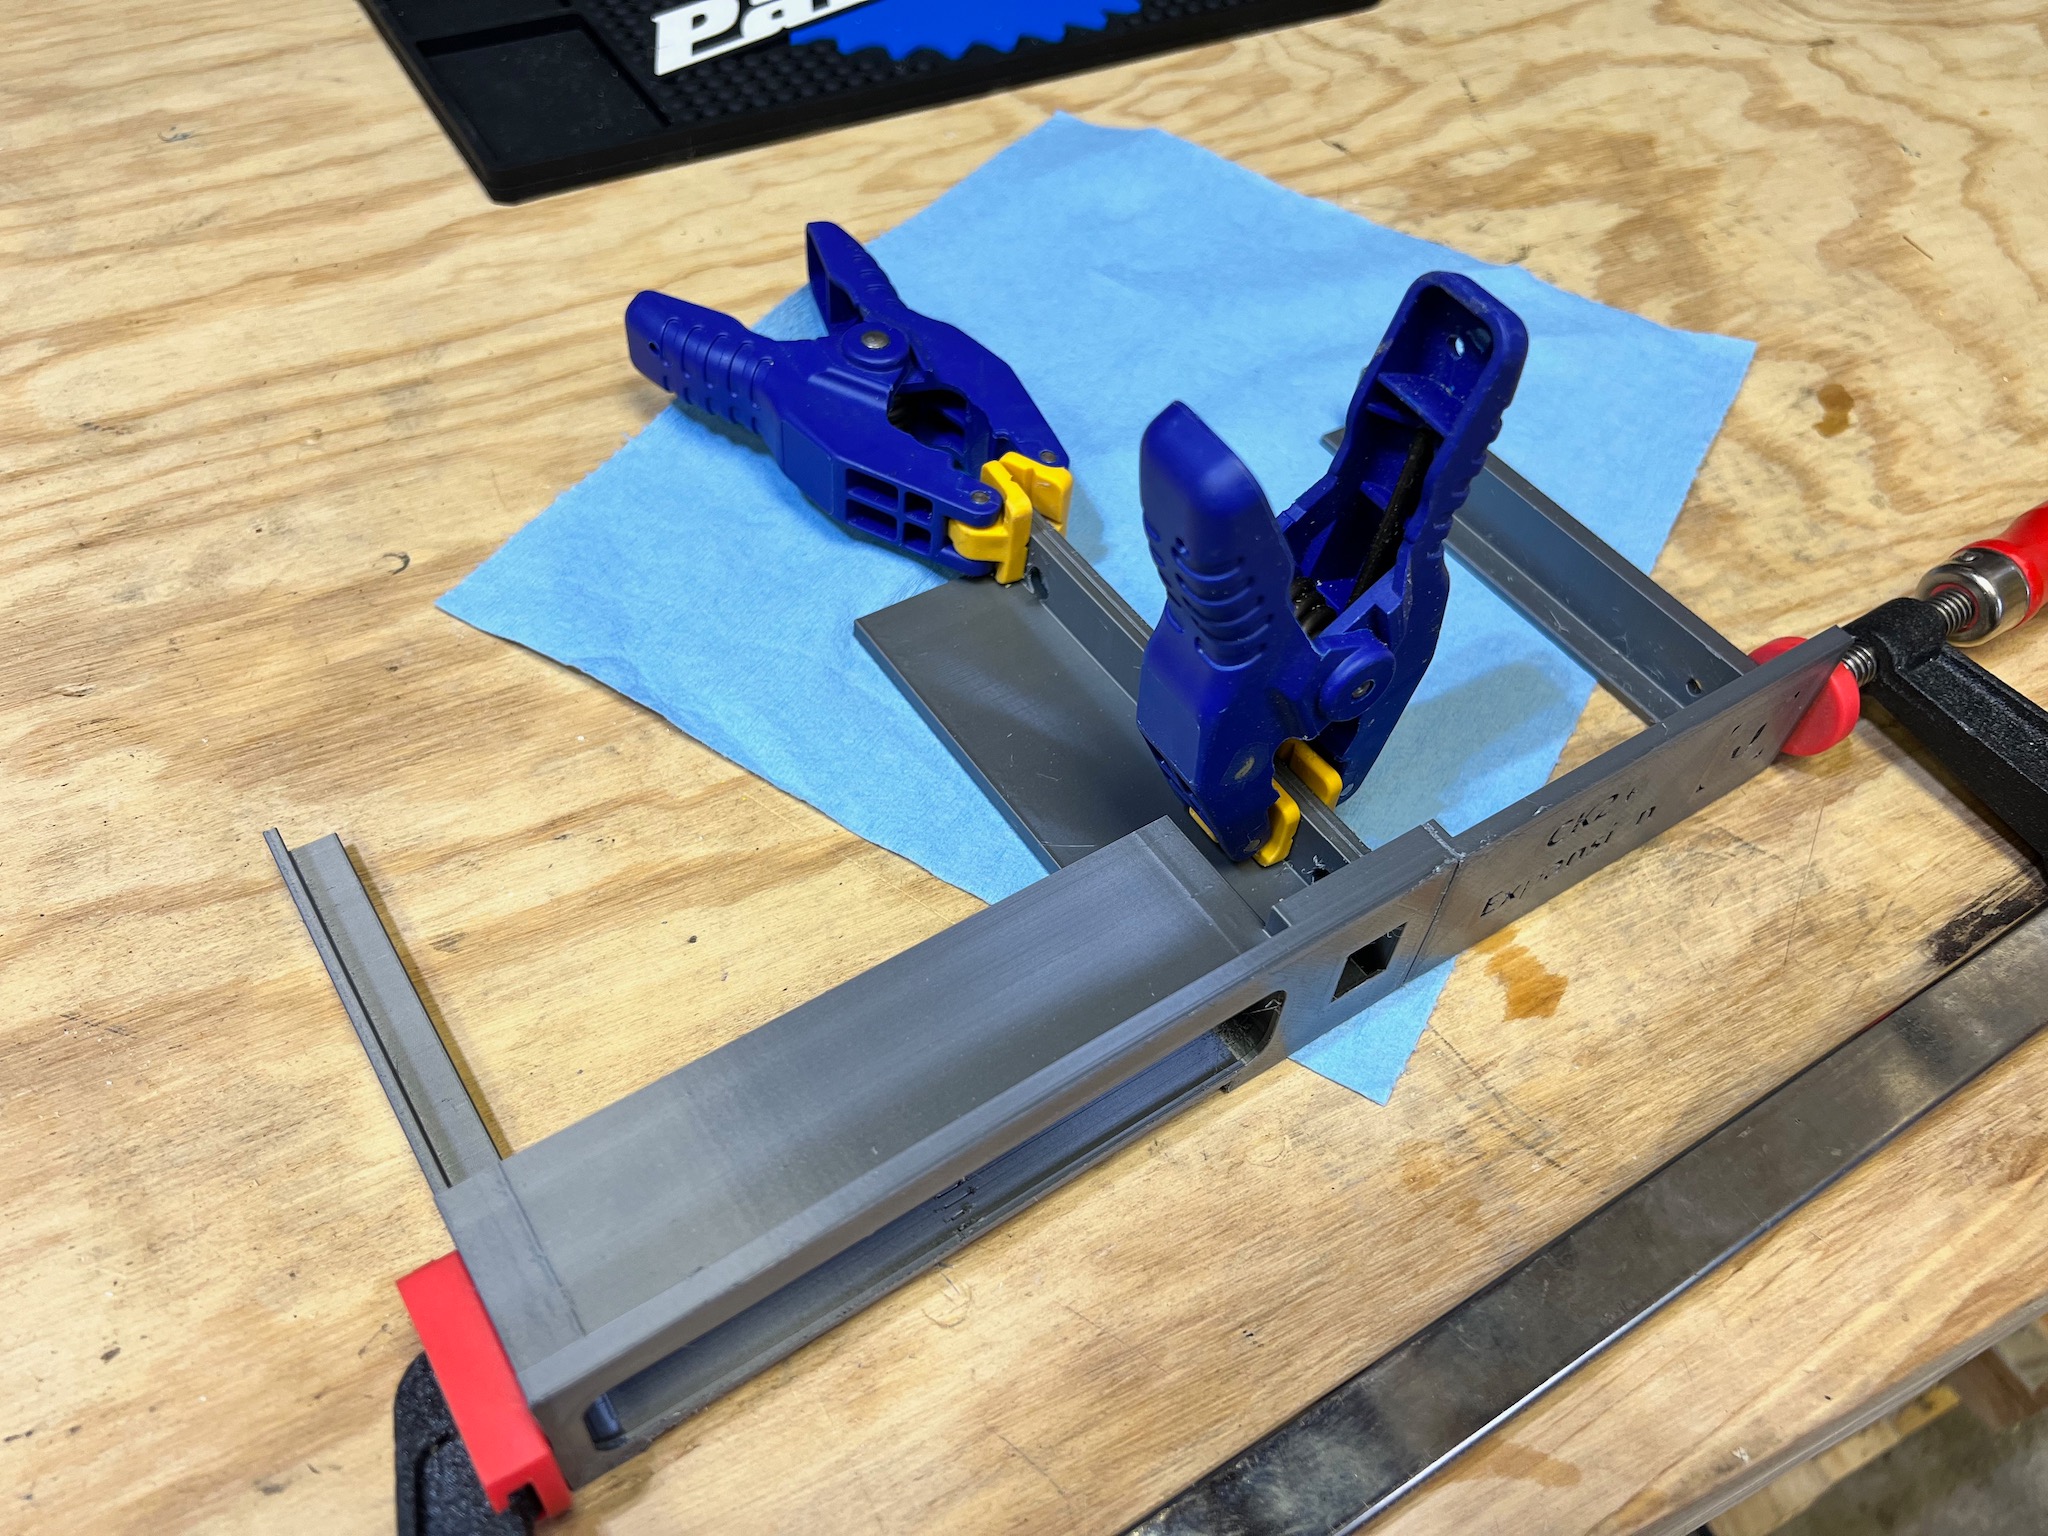
I first tried to use the mount provided by this project. It wouldn’t fit on my printer in one piece, so I pulled the design into Fusion 360’s mesh mode and split it into two pieces. I then printed them, roughed the edges, and glued them together with super glue:
This print took ~25 hours, because I printed it in PETG, which works best with slower print speeds. I chose PETG because this is going to be installed alongside other Ubiquiti networking gear which produces a fair amount of heat:
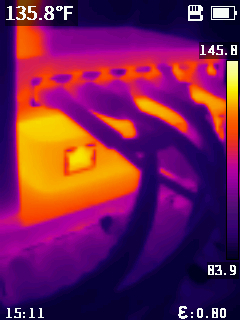
I don’t know how accurately I set emissivity for that photo, but the highest temperatures there are certainly at least close to 140ºF, which is above the temperature where PLA would start being flexible.
The result looked like this:
I was not happy with this mounting solution. It didn’t feel very secure (in part, certainly, since I had to glue it together). It also provides no shelter for the hard drive, it takes up a lot of horizontal space, and it doesn’t provide a nice home for the hard drive’s power supply. It may make more sense in a rack-mount-ish setup, but that’s not what I’m working with at home.
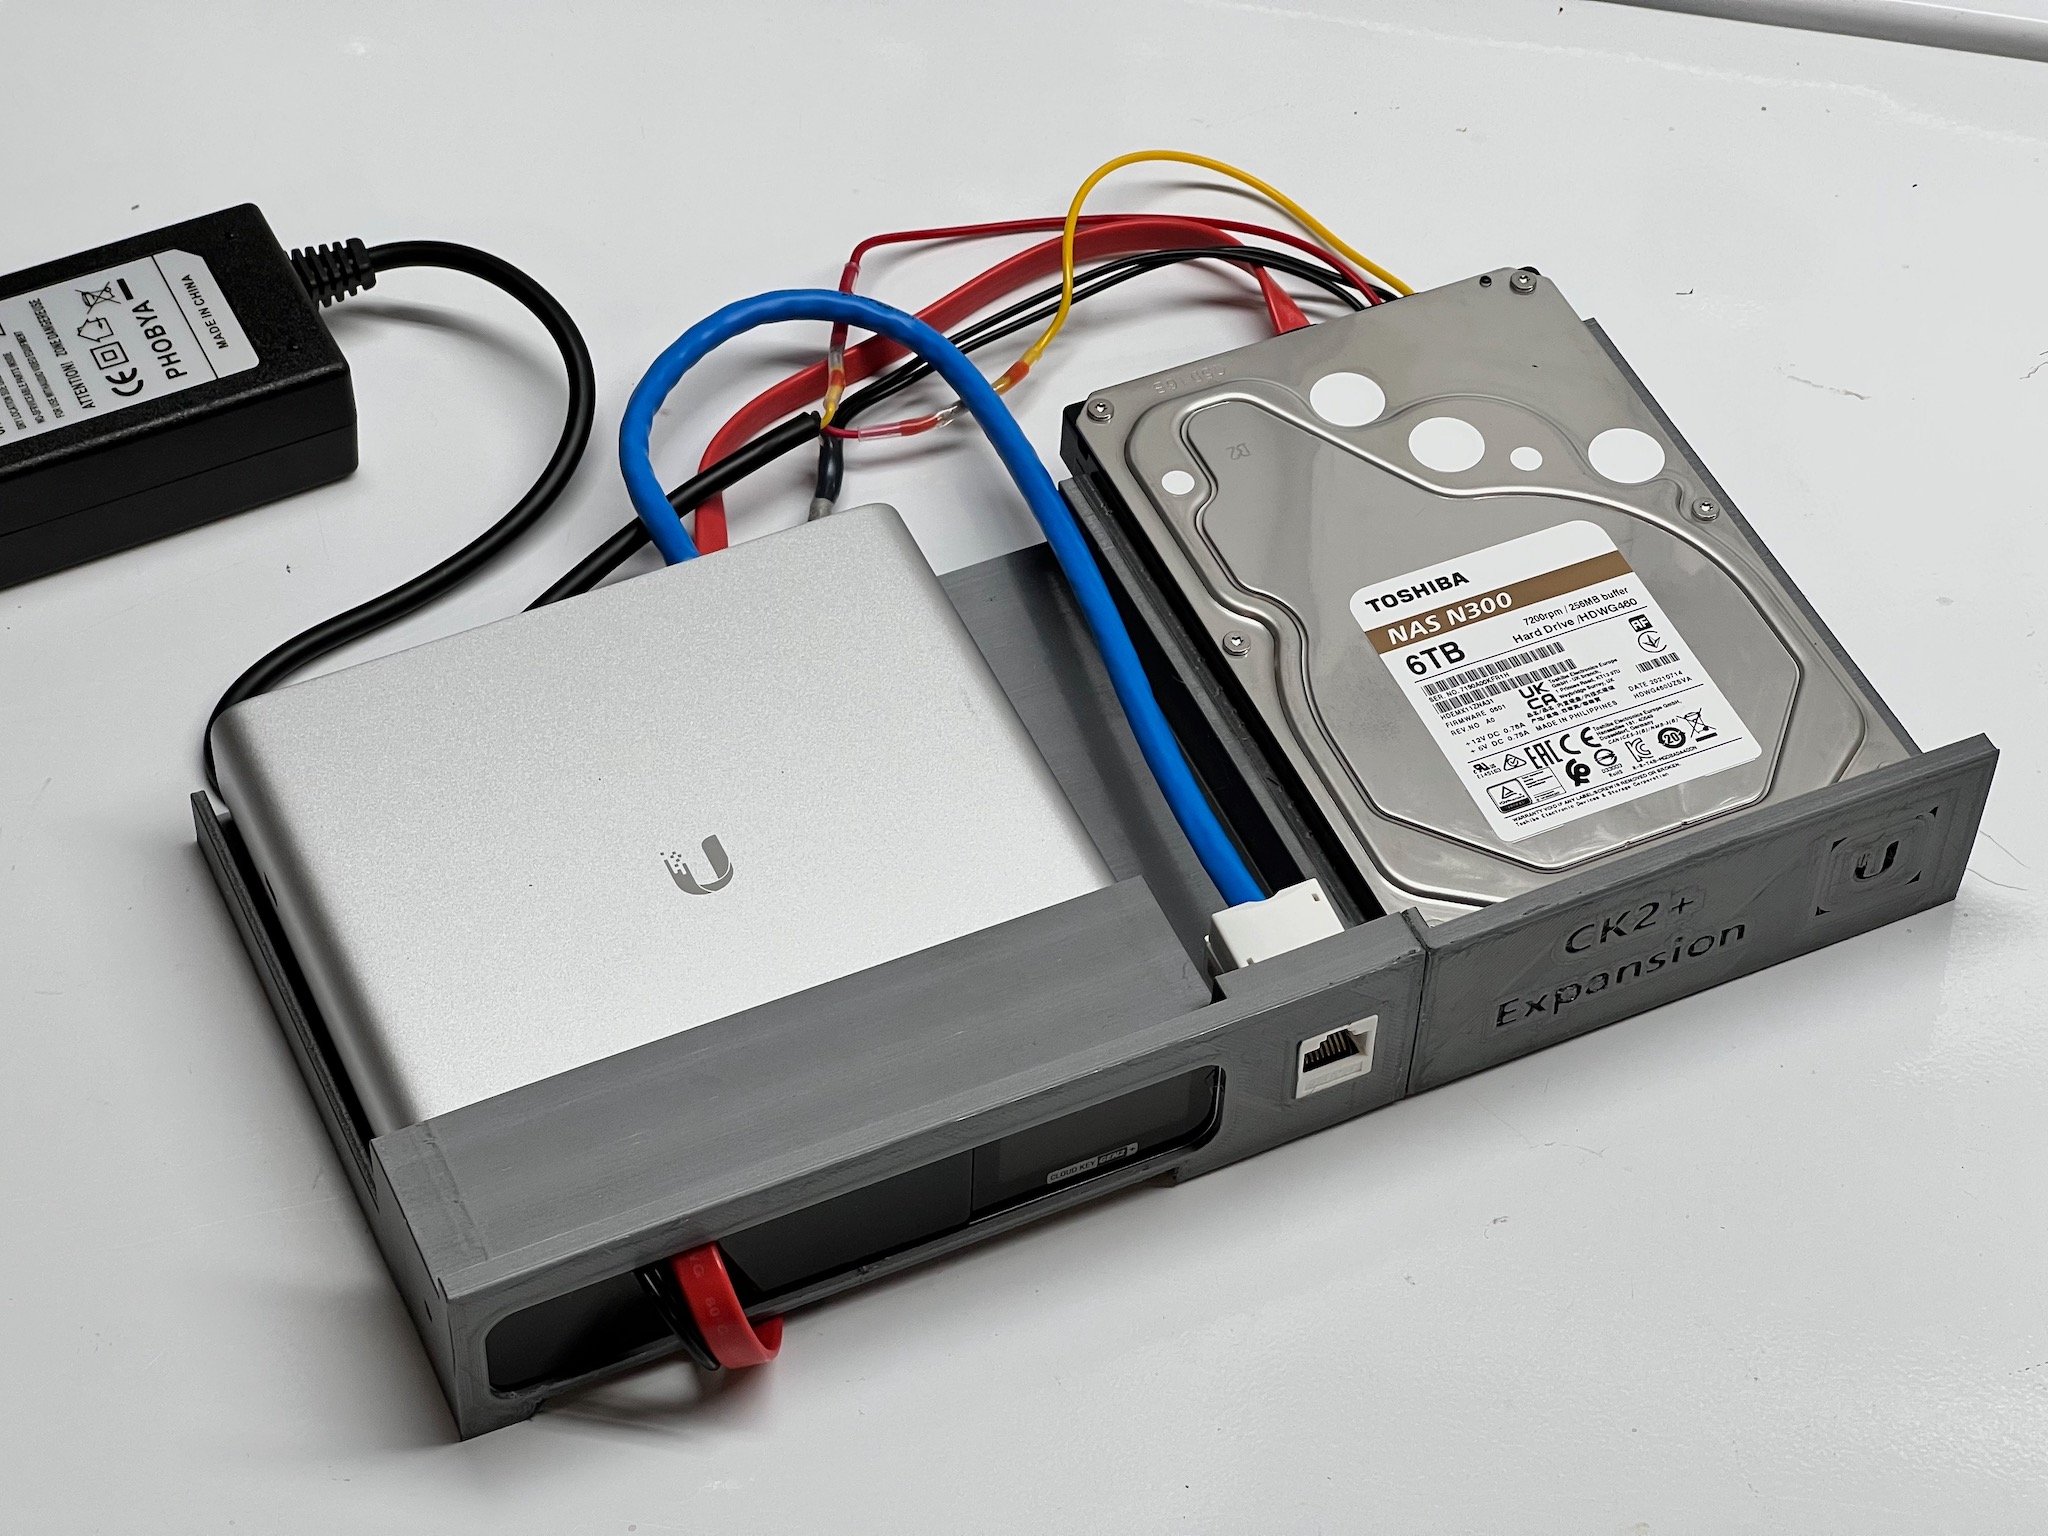
So, I designed my own enclosure, which safely and securely houses the hard drive, Cloud Key, and the new power supply:
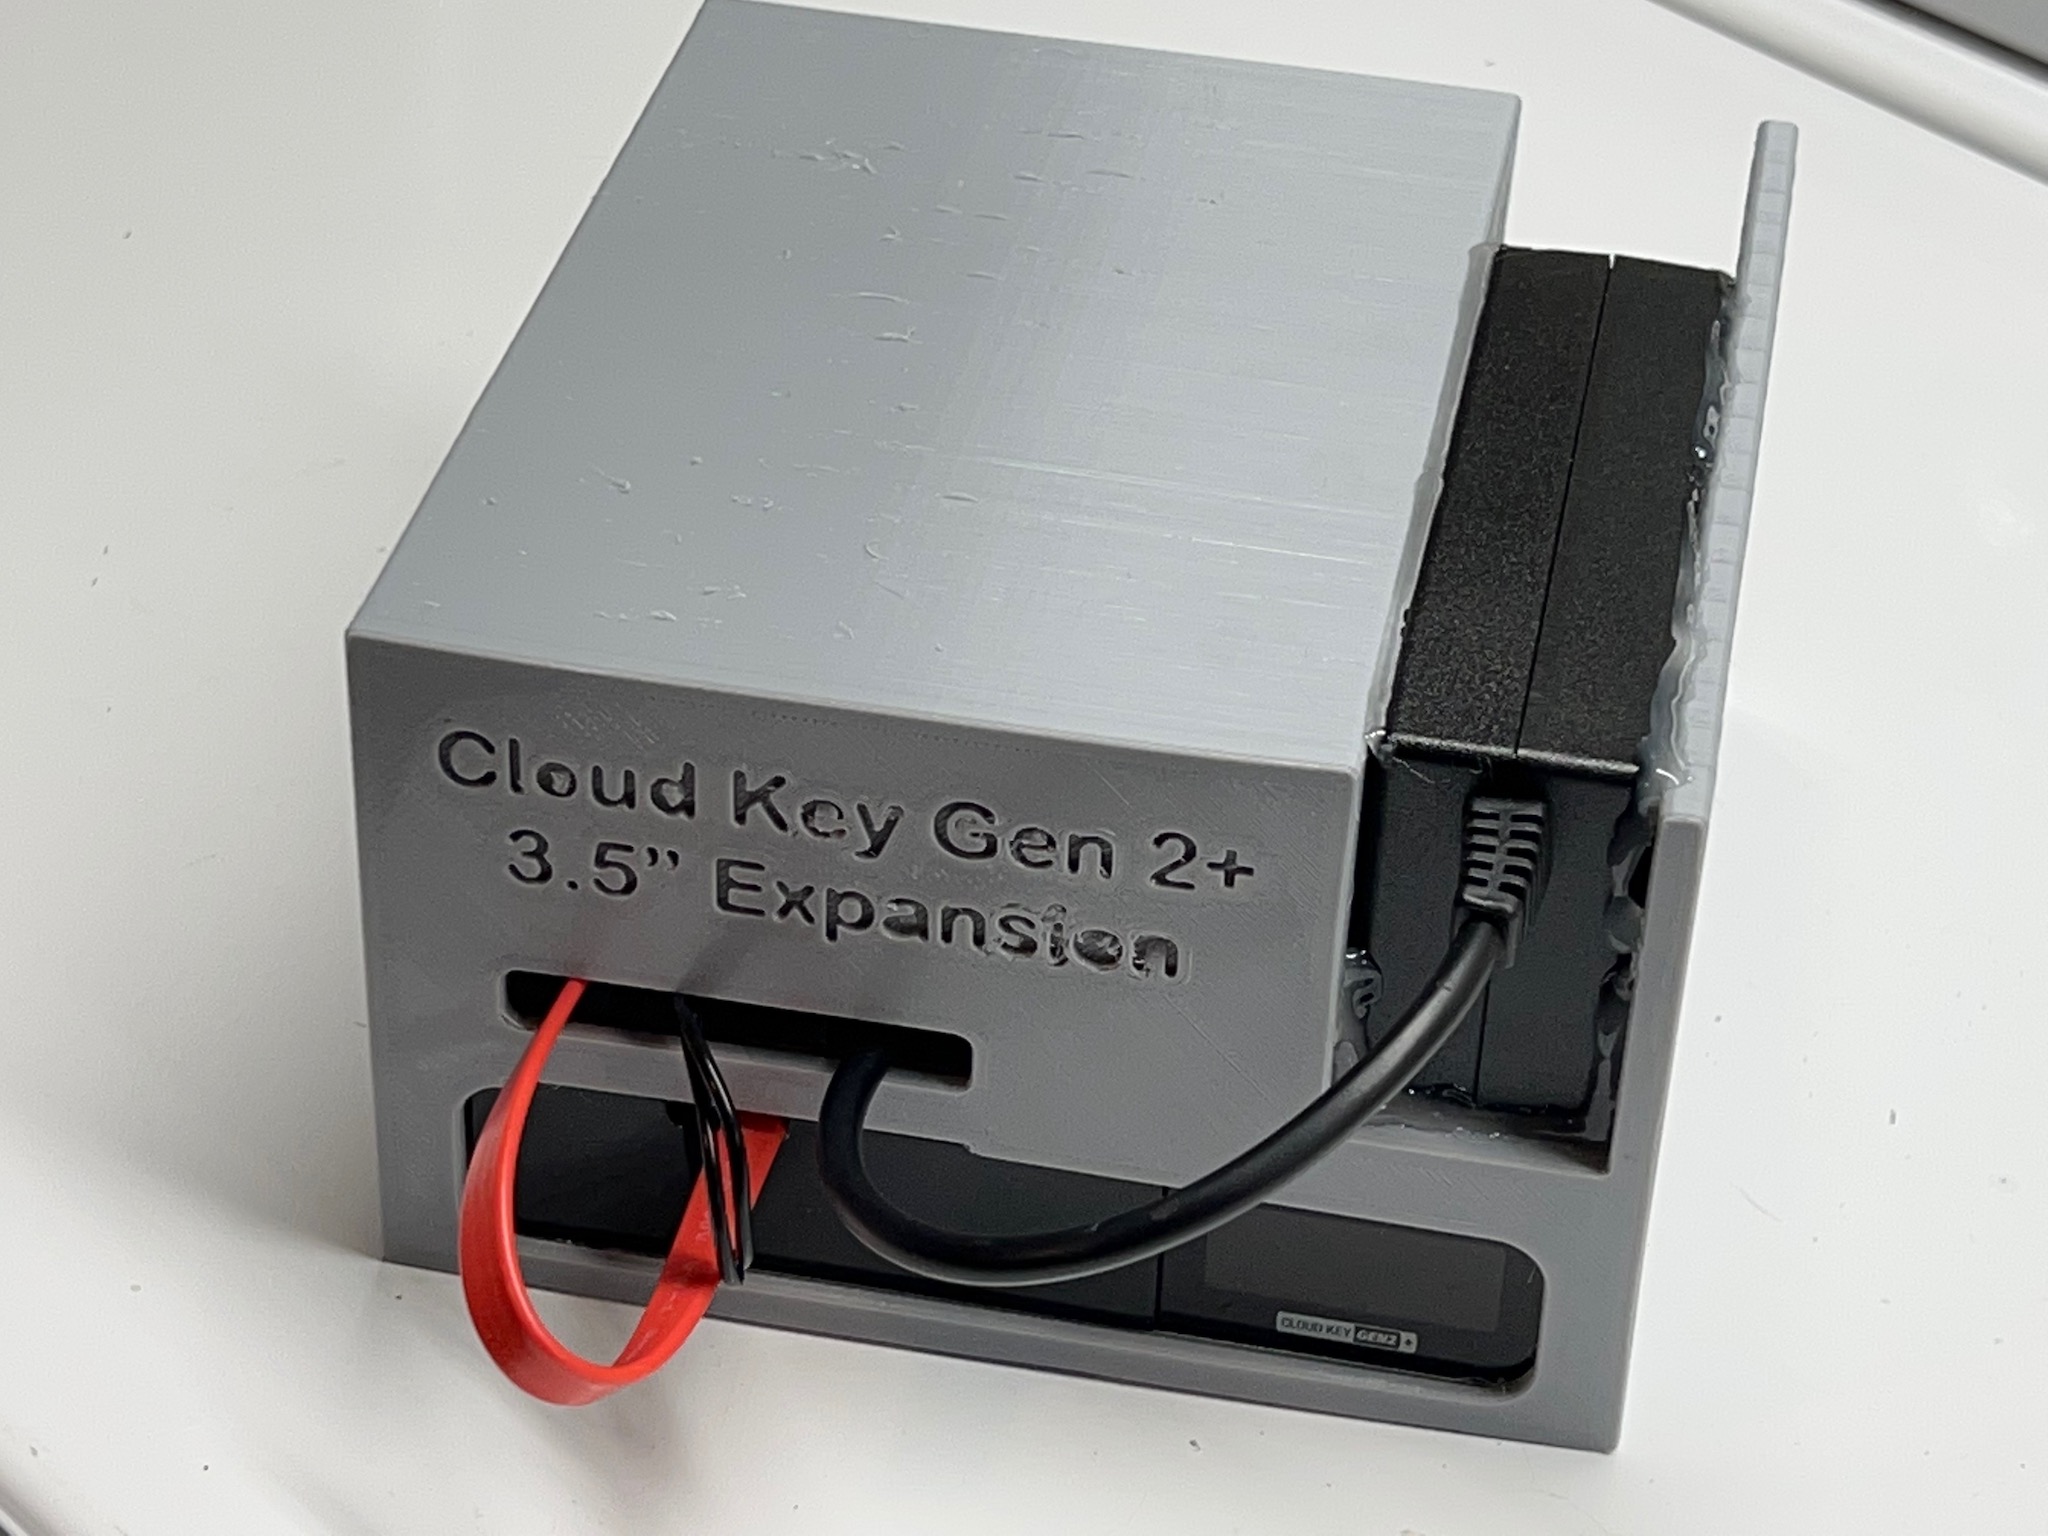
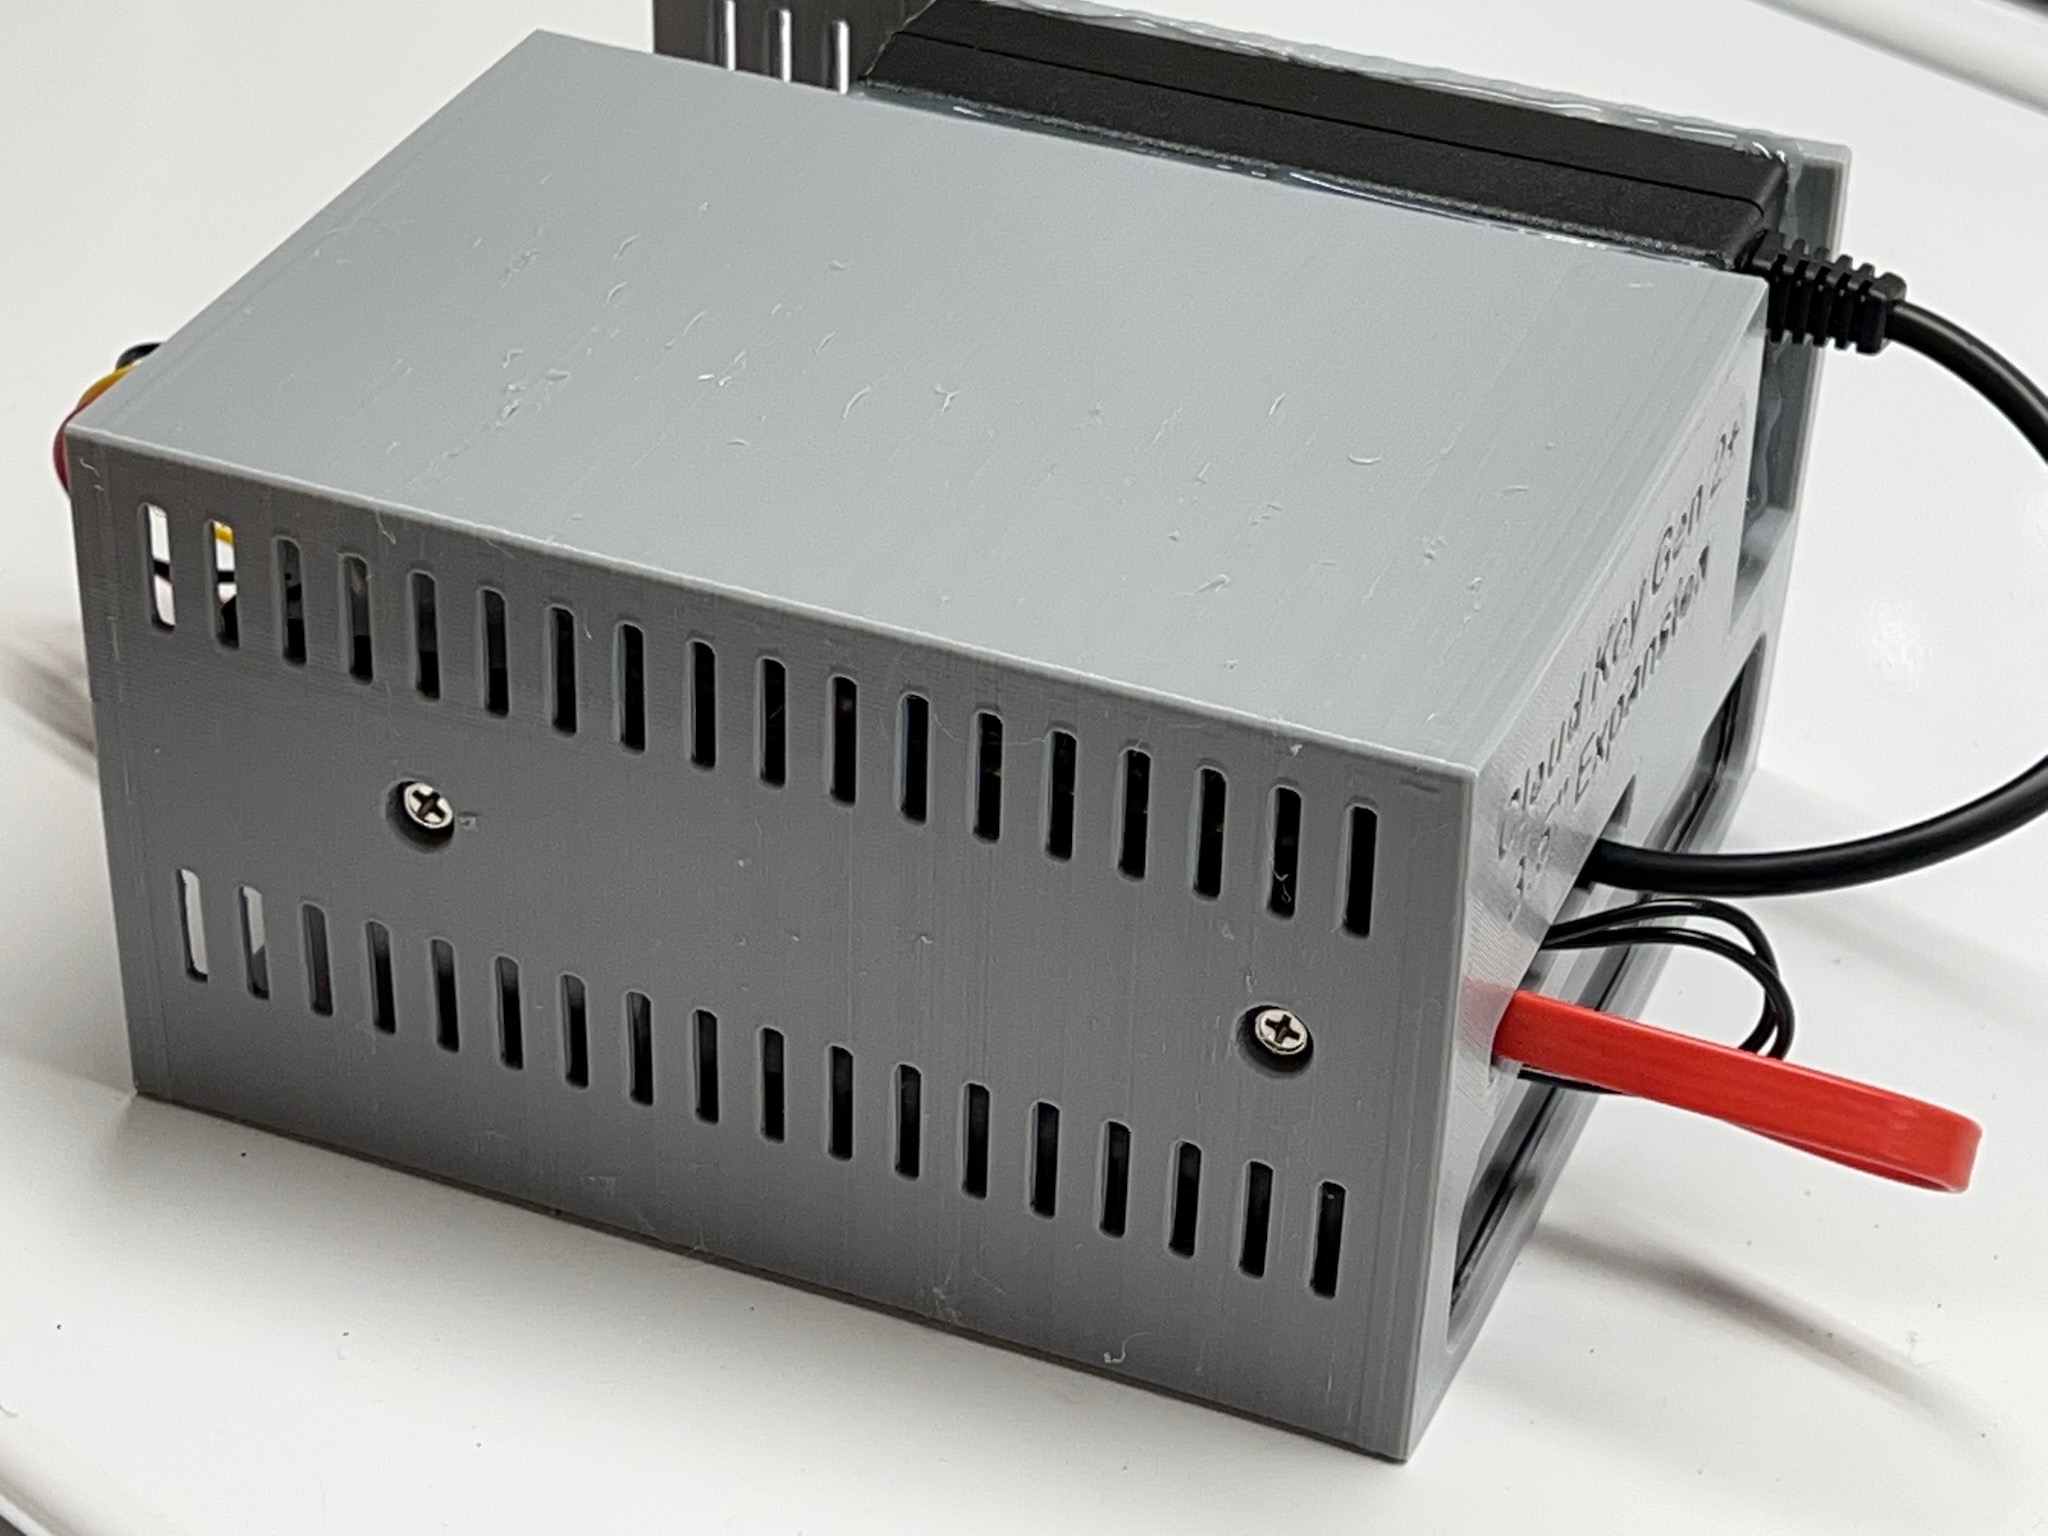
This design took 50 hours to print (again, in PETG), but I’m very happy with the result. It’s easy to move around, it’s secure, it allows viewing the Cloud Key’s status LED, and it provides plenty of cooling.
The design is available from Thingiverse, and I’ve uploaded the STL and Fusion 360 files, should you wish to customize it.
Installation
Installation in the enclosure is easy.
- Route the wiring harness through the holes in front
- Mount the SATA extension block in the Cloud Key’s hard drive tray
- Install the HDD tray in the Cloud Key
- Slide the Cloud Key into position
- Mount the hard drive in the enclosure
- Connect the wiring harness to the hard drive
- Slide the power supply into place; optionally secure it with hot glue
All that’s left is to install the project in its permanent home and restore the UniFi Cloud Key, Network, and Protect backups I took before testing the project.
Be sure to plug the hard drive power supply in first, before powering up the Cloud Key.
Connect the HDD power supply and the Cloud Key’s power supply (or the PoE switch powering the Cloud Key) to the same outlet/power strip. This helps avoid any potential grounding issues. If either of these is plugged into a UPS, the other should be plugged into the same UPS.
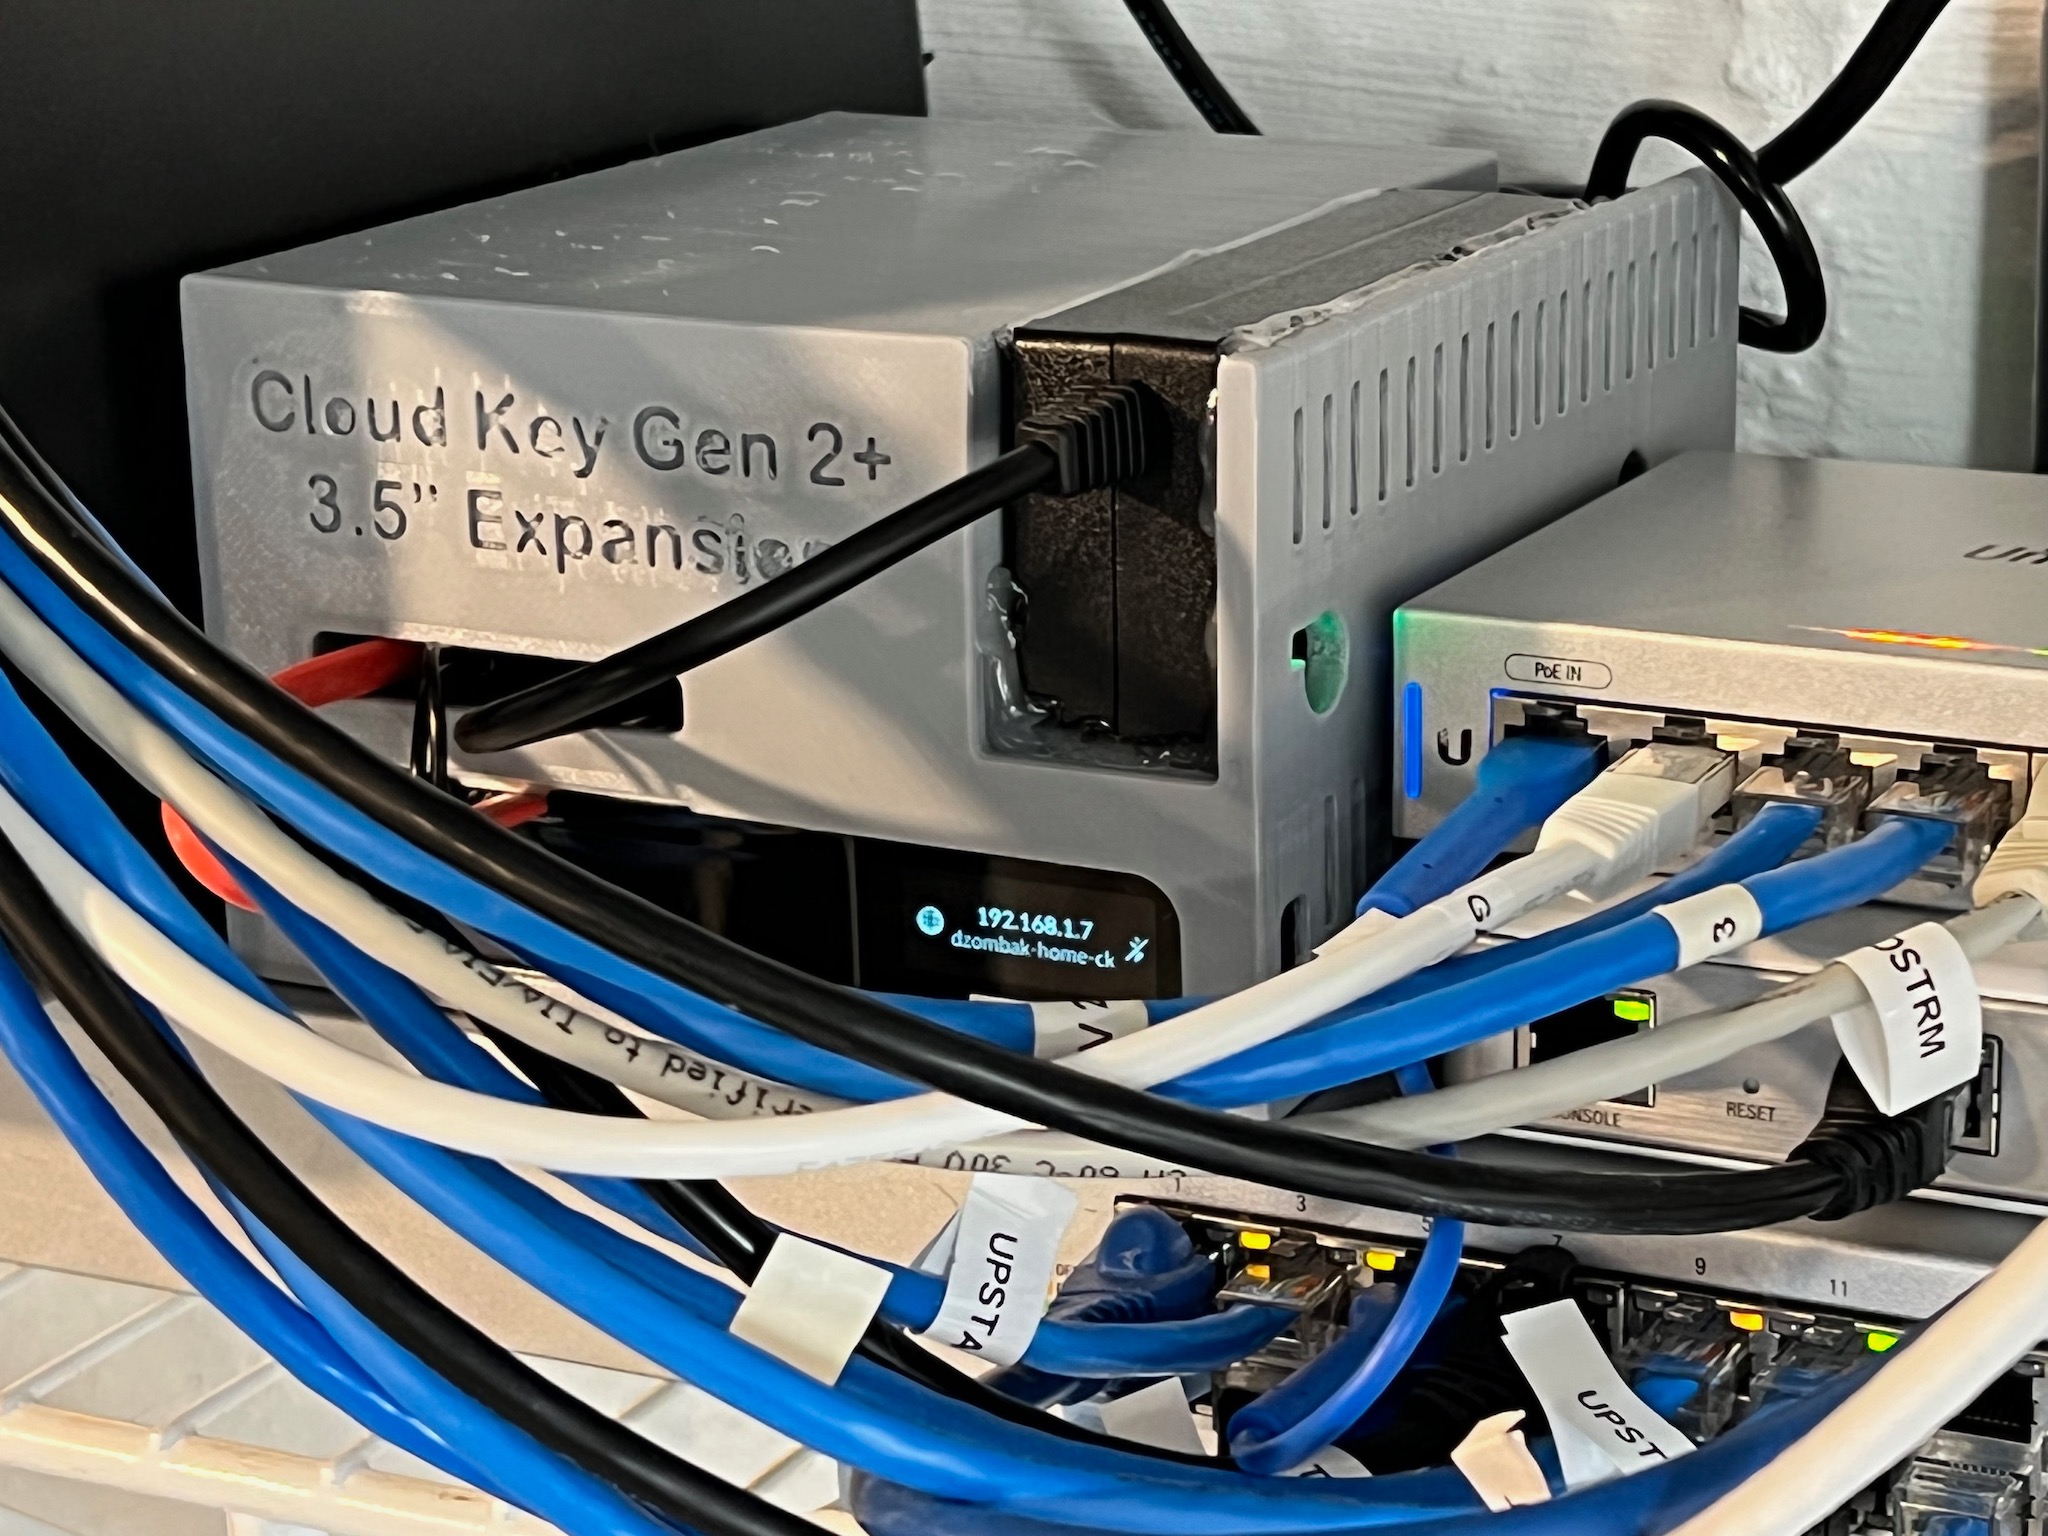
The final product in its home: